Have you ever felt compelled to do something? And you can sort of explain why you are compelled, but not entirely - you just know its what you have to do? I can't say that that has happened to me often; but it has happened to me this year.
I'm finally telling everyone in my life about my big plans -- I'm over hauling my life!
I have been in an intense career transition workshop since April. Lots of hard work, but I have learned so much about myself, and about what makes me happy. It's been an amazing journey, but its one that is just beginning.
I'm selling my house....
I'm selling pretty much everything I own (except my tools, a few dishes and my dog.... )
I'm going to build and live in a Tumbleweed Tiny House. In wheels. Off the grid.
House showings start this week....
My big sale will be November 3rd.
I hope to have a much lighter load in every sense of the word by the time I travel to my parents' in Minnesota for Christmas.
I may post a few more times here, but I've started a new blog, documenting my transition. If you'd like to follow my journey, post in the comments, and I'll send you an invitation for the new blog. (I haven't published it to internet browsers yet.) I think several of my readers have already made the jump, and frankly I have no idea how many people have been reading this blog! : )
Thanks for reading!
Tuesday, October 9, 2012
Tuesday, September 4, 2012

Friday, July 27, 2012
Bedroom Wall & Baseboards
Here's a project update on the wooden wall in my bedroom...
But now, of course, I have to remove the new baseboards and remove the sheet rock we added! Awww, isn't renovating fun?

Here's to the right of the baseboard vent:

The next step in this project is to sand off that white stripe that is parallel to the floor. I'm not exactly sure what it is -- glue, or sheet rock mud, or....? And some of it still has the linen vapor barrier fabric stuck in it. Unfortunately, the line falls about a half an inch above the baseboard, so it shows, and it must go!
Going WAY back, when I moved in, I re-did all my baseboards to get rid of all the yucky paint and just have clean, stained wood baseboards. In pretty much the entire house, when the baseboards were removed, we found that the sheet rock didn't extend all the way to the floor. To remedy that, we "scabbed in" some supporting wood along the floor, and added about 6 inches of sheet rock, and then installed the new baseboards.
You can read about that project here:
You can read about that project here:
Fast forwarding to this current project, I removed all the sheet rock off one wall in my bedroom to reveal beautiful nail ridden original planks. Love.
If you missed that post, it's here:
http://my1929tudor.blogspot.com/2011/12/bedroom-wall-revealed.html
If you missed that post, it's here:
http://my1929tudor.blogspot.com/2011/12/bedroom-wall-revealed.html
But now, of course, I have to remove the new baseboards and remove the sheet rock we added! Awww, isn't renovating fun?
Last weekend I removed the baseboards, and pulled off the remaining strips of sheet rock. It's just as lovely behind them as I recalled! Because I knew I wouldn't be working on the project again for a week, I taped paper over the openings, to discourage anything from under the house paying me a visit.


I've pulled it back for your viewing pleasure.


I've pulled it back for your viewing pleasure.
Here's to the left of the baseboard vent:

(Ouch, must replace that white outlet cover!) Similar to what I found on the vertical door frames, it looks like a hatchet was used to rip the bottom plank... When you add the scraps of wood along the floor, not only do the widths of the pieces have to be really random to fit, but often there isn't anything behind them to nail them to...
Here's to the right of the baseboard vent:

The next step in this project is to sand off that white stripe that is parallel to the floor. I'm not exactly sure what it is -- glue, or sheet rock mud, or....? And some of it still has the linen vapor barrier fabric stuck in it. Unfortunately, the line falls about a half an inch above the baseboard, so it shows, and it must go!
I've been sanding by hand, but hoo-whee it is slow going. I plan to try a Dremel with a sanding wheel next. I have an electric sander, but I am wary of sanding too much and changing the wood color just in that area. I do not want to end up having to sand the entire wall to make it all match...
When that is done, and I'll scrub down the whole wall with warm water and a stiff bristle brush. I did that on the narrow wall by my shoes, (see this week's earlier post) and while the wall didn't really look much different after it dried, the water in the bucket got VERY dirty....
Next, also before the baseboards go in, I need to figure out if I am going to oil the wall, and if so, what in the heck type of oil should I use? The wood is very, very dry. It doesn't need a stain - the color is gorgeous - but I feel like it needs some type of love. I don't really want to put on any polyurethane either, but maybe that is what it needs. I hate being the first person to put an unnatural coating on natural wood! I sent an email inquiry to a local renovation company, but so far I haven't gotten a reply. I've also surfed around on some wood working forums online, and done a bit of online research, but at this point I don't have any firm ideas of what's needed. If you have any ideas, please, share.
At that point I'll be forced to address the HVAC wall vent issue. The duct material at the opening is very old - probably original - not 1929 original because they didn't have central air back then - but original whenever it was added! -- and it doesn't exactly accept any of today's vents. As with many things in this house when I bought it, the vents were attached with caulk. Caulk with about 17 layers of paint over it. Gross! I sanded all the paint of the vents, but that doesn't make them straight (they are so warped!) and then - no way to attach them. And this is a problem in nearly every room of my house... I may have to go under the house and re-do the last bit of duct work coming up to the vent, and the end of the duct work that peeps up into the baseboards to accept the vent. May I just say there that I am trying to avoid all of that...? I'm also contemplating fabricating my own vents out of some time of screening and wooden frames. I don't need them to be louvered and adjustable like the metal ones are... Frankly, that is become a more and more appealing route to go.
And then, finally, (are you still with me??) the new baseboards will go in. I'll be making new ones, because without the sheet rock
the baseboards will be just a hair too short to meet properly in the
corner. I already have the lumber, but I still need to stain and seal it.
I'll install the quarter round vertically up the wall in the other corner where the wood wall adjoins the sheet rocked wall, and then crown moulding at the ceiling. I haven't stained and cut the new baseboards yet, nor have I purchased and stained the crown moulding yet. But I did bring a sample home, and I liked it, so I at least know what kind I am getting... I'll need to do the whole room... so I'll need to calculate that cost first and see if that is going to happen now or later. I need a money tree, even though it's too hot to be landscaping...
Tuesday, July 24, 2012
Bedroom Door Frame - finally some progress
Red and I spent a fair amount of time this weekend inside (outside it was 107!) working on the beleaguered door frame project.
How did we get here?
http://my1929tudor.blogspot.com/2011/08/interior-door-trim-and-door-frames.html
http://my1929tudor.blogspot.com/2011/12/bedroom-wall-revealed.html
http://my1929tudor.blogspot.com/2012/02/project-y-weekend.html
The bedroom side of the bedroom door frame was done, except for missing plinth blocks at the bottom. The hallway side of the bedroom door frame needed sheet rock and trim. We made great progress -- in fact, pretty much all that remains on the actual door frame is the polyurethane coat alternated with a bit of sanding. (Considering that I started this project in August of last year...it's about time it neared completion...)
I'm out of practice on documenting the project steps as they happen, so all I can give you today are end product photos. Before photos were taken we cut and patched sheet rock around the door frame. We taped, bedded, (I may have Miss Collins, my junior high home ec teacher, to thank for my wrist action/cake frosting lesson...) textured (go ahead, as me about a rubber glove and a dinner plate covered in foil,) painted the sheet rock. (FUN - No, really, it was fun! I'm serious!) Then the wood trim went up.

 |
| Need to touch up paint above door with flat, not eggshell... |
Inside this door to the right is the short part of the now exposed wood wall. There we got corner trim installed, and pulled off the baseboard to remove the sheetrock that was behind that. With the sheetrock gone, the baseboards were too short to meet properly in the corner, so we re-did those as well as the quarter-round that trims them out.


And then I finally got my "rigged" shoe shelves painted silver to match the closet doors:

I'm still working out this portion of my "closet." My winter coats and sweatshirts hang above the shoes. At the time that I installed the IKEA closet system to the left, I couldn't extend the closet here because of the swing of the bedroom door. Now that I have decided to put in a sliding barn door on a rail, this corner could become an enclosed portion of the closet. Work in progress...
Here's the plinth block at the bottom of the door frame:

I intended to use the old ones that were original. I removed them with care, and sanded them down (81 years of paint, people!) only to discover when I was done (with two) that they were too small for the new trim! I considered not using any at all, but I do like the look. I researched them - styles and periods - and ultimately just bought some at Home Depot. Boring. But they work... I also had to look at many photos about placement and size - and best I can tell this is indeed how they should be placed. So. There it is: the new plinth block. If I have counted right, ultimately I will need 28 more of those...
Next up? The removal of the sheet rock from behind the bedroom baseboards along the wall on the other side of the door, addressing the bane-of-my-existance HVAC vent, and possibly oiling the wood wall. Stay tuned.
.
.
Monday, July 23, 2012
Kitchen Whitewash
One afternoon last week I had finally had enough* of the awful putty colored kitchen cabinets that remained on the fridge side of my kitchen.
Here's the before:

And here's the after:

Are they REALLY white? Yes. Maybe too white? Perhaps. Did I mistakenly grab the interior "flat" bucket rather than the interior "eggshell" off the shop shelf? Yes. Do I care? Not really - it's still a major improvement in my eye.
Bottom line is, it's brighter, cleaner, and it's a great base if I decide to do something else in there...
* Were you worried about where this sentence might end up? I was. But relax, it's only painting.
.
Monday, July 2, 2012

Tuesday, June 19, 2012

Monday, June 11, 2012
Another Privacy Screen
With all my posts about privacy screening projects, you may conclude that I try to hide from my neighbors! Not true. It's actually the opposite... I love to have my curtains open, and I am also outside on my porch a lot, and while I am not doing anything interesting (er, at least I don't think I am...) I worry that my neighbors are weary of seeing me.
I've been struggling with the exposure from driveway end of my porch. The order of things is this: The short end of my porch, my narrow driveway, my neighbors' living room windows. They are lovely people. I could possibly call them friends and neighbors. But day or night, they never close their blinds. Now, I'll also say, I don't think they spend much time in their living room. But I spend a lot of time on my porch. And I've become a wee bit self conscious of all my porch sitting.
Most often I crawl out there post-shower (but appropriately dressed, I promise) with a beverage after a full day of working on a project, prop myself up and try not to pass out from happy exhaustion. Wet hair, lounging clothes, my iPad or a book and an adult beverage. Or, I am out there really late at night in the dark, just enjoying the solitude of my porch/street. Or, it's Sunday morning, and I'm clutching my coffee and having my Sunday morning "cawfee tawk" (a la SNL) with my bestie in Minneapolis. Point being ... I spend an enormous amount of time out there. I. Love. My. Porch.
For many months I have been crafting in my mind some type of privacy gizmo for the very narrow space between the porch and my driveway. Here's the space I'm working with - I've angled my love seat in an attempt to shield the sitter... I used to have it backed up against the window...

I didn't really see planting plants directly into the ground here as an option for a couple of reasons. One, there is a lot going on in the ground right there -- sprinkler water lines, electrical wiring -- that I really don't want to disturb. Secondly, I already struggle with soil migrating from the bed into the driveway every time it rains, and I haven't been able to envision a type of edging that I like to hold it in place that could take occasional car tires... As a result, I was envisioning either a raised planter or some type of wall.
I was going to do one of these:


The concept of a wooden screen was attractive to me because it would be uber easy to build and instantly full height. Air would still pass through for circulation. The hardest part would be digging the post holes for the support posts, and setting the posts in concrete.
I showed these two photos to one of the neighbors next door, and she liked the second, more open panel best. She said she actually likes seeing me sit out there and that that one doesn't provide total block out of vision. But when I mentioned that I had although thought about a planter, she jumped on that idea. I pressed her about it and she said she'd rather have a view of greenery versus wood. I had to give her snaps for that. A planter it would be.
I still had some wood left over from my neighbor's deck demolition - and quite frankly was weary of looking at it stacked in my carport. I had used some of it to build a potting table (you can read about that here: http://my1929tudor.blogspot.com/2011/06/ta-da-potting-table.html) but still had some left, and I just couldn't bring myself to put it out in bulky trash.
I did some measuring - the porch opening with allowance for the outdoor electrical outlet would accept a 5 foot long planter. For width, I estimated that 12-15" would fit nicely. I wanted the top of the planter to be even with the floor of the porch. The similar height would help it blend in, I hoped.
Sunday began by laying out all the remaining reclaimed lumber in my carport by type of wood and length to assess what I had to work with. Then I inspected the longer pieces for splitting and hard to remove nails. I was a little shy of how much I needed to build the design I had in mind, so I had to modify it a bit - I would have liked to have two planks for the bottom, making the planter wider - but it's okay. And I would have liked to have pieces that were a little less deteriorated for the legs - I really wanted to rip the leg planks and have two narrower pieces to wrap the corners, but I don't think the wood would have been strong enough to use in that way. Nonetheless - I'm pleased with the end product - although it looks a bit like a horse trough to me. (Recall the indoor buffet table* that I likened to a hitching post? Hmmm.. I sense a theme... lol)
 |
The lighter colored side |
The lumber, by virtue of having been part of a deck, has one side that was exposed to the elements and therefore is weathered and darker, and has one side that was the protected underside of the deck, and it is a lighter color. It's sort of hard to see in these photos. I built the planter so that one side is the light side (that matches my brick quite well) and one side is the darker wood - thinking that nobody can ever see both sides at once, and that the two colors give me versatility for placement. I used that same dichotomy of color with my hanging frames on my back steps.
(http://my1929tudor.blogspot.com/2011/07/when-i-had-my-back-steps-designed-and.html)
(http://my1929tudor.blogspot.com/2011/07/when-i-had-my-back-steps-designed-and.html)
The finished planter is 5 feet long, only 11 inches front to back, 17 inches deep, and 24 inches tall; a funky size that I'd never find in a store, but it's the size needed for my space. I challenged myself to use only the reclaimed lumber - no supplementing with new lumber. Success! I love the character that came from having to piece two shorter boards together for the front middle plank, and that there is some red lettering stamped on one of the boards from its previous life.
I thought that marked the end of my day. I showered, but did my aforementioned post-project collapse in the living room, in the air conditioning. It was ... hot outside.
But after a respite, I mustered the energy to go buy the plants. I wanted bamboo, but the guy at the nursery said the roots will expand so much over time that they would literally blow a wooden planter apart. Um, not a goal. Then I wanted horsetail, but we determined that when it got tall enough to be a screen, it would flop over. Well that won't work. We discussed Nandina and this other shrubby thing (the name of which I don't know but I've never liked it anyway...) but decided they would both get too woody (i.e. transparent) at the base. And so... the plants are red tipped Photinias. Mind-numbingly boring, but they grow fast, can be pruned to shape, and will make an effective screen. And, I had two random Home Depot gift cards, which made my plants cost just half what they should have. Score.
My across-the-street neighbor was out watering when I got home, and I asked her to help me move the planter from the backyard to it's new home - it is ridiculously heavy. I had already determined that I was saving the actual planting for Monday morning, when it would be cooler outdoors.
Before setting the plants in, I laid in two layers of window screen (leftover from another project) at the bottom and partially up the sides of the planter to keep the soil from falling out the spaces between the planks. I added 3 inches of rock (a bag the previous home owners had left behind the shed) for drainage. On top of that, I added organic compost and organic fertilizer. I dropped the plants in, and filled in the spaces between the root balls with with organic potting soil. I watered it all in with water from my rain barrels (newly full from our rain last week - yay!)


Grow! Grow! Grow!
* Sideboard/hitching post: http://my1929tudor.blogspot.com/2011/12/rustic-sideboard.html
.
Monday, June 4, 2012
M I N T Y
I have one of those old timey driveways where there is a strip of grass down the middle. Well, I'm sure the original intent was to have grass there -- I do not. It's a challenging area to landscape; it gets a bit of hard use - occassional heat from parked car engines, and it's not connected to the sprinkler system. It was just dirt when I moved in, and I personally had no intention of ever planting grass there. I do love that it's not a solid concrete driveway though - when given a choice I will always opt for green surface areas versus concrete or asphalt.
Everyone (you know, "everyone") always talks about how invasive mint is. Over the years I have planted it in areas where it's difficult to get anything else to grow and had success. Once you get it to take, you are pretty much good to go. I thought the center of my driveway would be the perfect space for mint - it's contained from spreading too crazily, and it's a hardy plant.
Overall I've been very pleased with it there. Originally I planted peppermint, spearmint, and pennyroyal mint. I learned that pennyroyal won't make it in the summer heat. The other two - pretty happy. They (you know, "they") say that you shouldn't mix the types - that they will hybrid themselves - but do I care? Not particularly. It all smells quite heavenly wafting up through my car vents when I drive over it, and it's all the same when feet tromp through it and the minty smell floats in the air. The plants on the front third of the driveway are really happy. The back two thirds don't get enough sun and it's mostly died there. I need to figure out something else for that portion. I have one healthy thyme plant, but it's not exactly doing the job... I'd love some riverstone and ground cover...
I have a make-your-own garden stone kit - the type where you can make garden stones with words stamped in them. Last year I made one that says, "minty" and put it at the end of my driveway, near the sidewalk. I hoped that it would let passersby know that it was mint there, and not weeds. Should I care about that? Probably not. Do I? Well, a little. And I do like plant labels.
But at some point "minty" cracked in half. I keep scooting the pieces together, smushing dirt around them to hold them in place - mostly in vain.

And then I saw this on Pinterest:
 |
| http://littlewhitedog-ie.blogspot.com/2011/05/blooming-marvelous-garden-letters.html |
And as I turned the image over in my mind, I had an idea. I know. I was just as surprised as you are.
I went to several hobby and craft stores, looking for big cardboard letters. They never had all the letters that I needed at the same time. I wasn't willing to buy one or two, and then hope that I would someday find the remaining ones I needed; I have enough projects going without buying half the materials needed and to have them lay around the house, waiting. After several attempts to buy them in a brick and mortar store, I turned to ThirdShift on Etsy. The owner said they would let me know when they had all the letters in stock, and they did. In short order I had my letters. These are 12" inches tall.
 |
| http://www.etsy.com/listing/93446926/paper-mache-letter-x-12-tall-ready-to |
Next I took a box cutter and cut away one edge of the letters, leaving me with a mold:

(I found zig zagged cardboard inside them for reinforcement. I pulled that out and threw it away.) Next I sprayed the cardboard with an aerosol waterproofing spray from my tub of camping supplies. And then I lined the inside of the letters with aluminum tape for additional protection against moisture, and to give them a little bit of stability. That took considerably longer than I expected - but I did have a little bit of OCD about it... : )
Planning to pour concrete into the letters, I cut up coat hangers and bent the pieces around into 3D shapes to use as rebar:


And finally, I mixed up a batch of concrete in my wheelbarrow, and filled the molds with concrete.

I left them dry for 6 days, and then carfully removed them from the molds:
And spray painted them a benign color:

Then I painted over them with some paint that goes on clear, but it supposed to soak up the sun during the day and glow at night, but.... best I could tell, it doesn't glow. Maybe I didn't put enough on -- I'll try another coat. But -- they still look great in my driveway bed of mint!

Now... as long as nobody drives on them.. : )
.
Wednesday, May 30, 2012
Planted!
I got my newly expanded front beds planted. Finally. Whew - I have to say I am relieved to be at this stage with this project. It was a doozy. I'm pleased with the end results though.
Here is the right side:


So what remains on this project? I have some seeds to put out on the left side - marigolds, for the remaining portion of my marigold seed trial that I am participating in; Dill, and .... others, but I can't remember sitting here now what they are.
For the right hand side, I need to switch out the mulch around the tree to match the rest of the bed. I need to re-do the fountain* reservoir dig up and repair some sprinkler heads, and did up the spigot to repair the leak. None of those sound like much fun, but all of them need to happen...
* Long post, coming soon...
.
Here is the right side:

The plants are small now, but they will fill in. I've learned the hard way to let them look sparse at first to allow for growth. Some of the plants I bought at the semi-annual butterfly plant sale, and some are transplants from the backyard.
I know that you can't distinguish plants in this photo, but on this side I planted a Butterfly Bush, two Horsemint for a blooming groundcover, 2 types of milkweed, and pentas. Pentas is an annual, and I am a perennial girl; but the butterflies love it so much that I relented. It's also pink - which I do not do - but again, to draw butterflies...
Already in the bed were Lamb's Ear and Turk's Cap. Lamb's Ear - I can take it or leave it. It is a variation in texture, and that's always good to have - but it doesn't really offer anything else. But it is well established so I left it there. And then the Turk's Cap; that's the tall green on the far right. It gets covered in little red blossoms that are loved by hummingbirds. It was also well established before I moved in, and I'll allow it to thrive.
And here is the left side:
In this front peninsula, my yellow echinacia is finally blooming. I added two milkweek in the right hand corner, and a type of daisy in the front left corner. The daisy is dead - but I'm leaving it there for now in hopes that it drops seeds. Along the front edge I have planted poppy seeds that a friend collected for me. I have tried to grow poppies before with dismal results, so I am hoping this time I have better luck. The bright green large plant that you see is a Flame Acanthus and it will have a ton of red blossoms for the hummingbirds. You can see the frosty Artesmisia poking out on the right hand side. Hidden from view entirely are fennel, Butterfly Weed, Cosmos, Calendula and a yellow daisy whose name escapes me...

Moving up the edge of the bed, just a red pentas there that is new. It's alongside Russian Sage

And then turning the corner...
Left to right I have another Horsemint groundcover (it's cut off in the photo). Then an agave plant. This was in a pot but I knew the pot was too small. There was no way to get it out of the pot and leave the pot intact, so I hit the pot with a hammer and split it in half. The agave had started a few new plants in the pot and I separated those out. I planted the larger 3 in this bed, and planted several tiny shoots in the backyard beds.
Next are some onion chives from a neighbor (planted those this morning!) 3 Goldenrod, one Pacific Daisy (fall blooming) another agave, two Rattlesnack Masters (a succulent that blooms) and a purple blooming Lemon Bee Balm (Monarda Citriodora) that blooms purple. It's blooming, but it's hard to see in this photo.

So what remains on this project? I have some seeds to put out on the left side - marigolds, for the remaining portion of my marigold seed trial that I am participating in; Dill, and .... others, but I can't remember sitting here now what they are.
For the right hand side, I need to switch out the mulch around the tree to match the rest of the bed. I need to re-do the fountain* reservoir dig up and repair some sprinkler heads, and did up the spigot to repair the leak. None of those sound like much fun, but all of them need to happen...
* Long post, coming soon...
.
Honeysuckle for Privacy
Did I tell you the honeysuckle plant on my first privacy trellis bit the dust? And that I had a bit of a "dust up" with the nursery from whom I bought it? It's too long of an uninteresting story of frustration that I prefer to leave behind, so suffice it to say that I had to go buy another honeysuckle. I did not return to the same nursery...
So the new one looks like it is going to have both yellow and coral blossoms on it - I swear I saw both on it when I bought it. That would be really cool. I planted it on Sunday, and re-strung the lines that I had to cut to pull out the old honeysuckle.
Here it is in place:

It's sort of hard to distinguish it from the shrub behind it...
And here it is, between the poles. The wires (fishline) are blissfully invisible. Blissful, that is, until you forget they are there, and you almost walk into them. Not that that has happened to me, but it could be cautionary tale.

It's gotten a late start compared to the passion flower vine, but I have high hopes. It gets great morning sun. I looked at it this morning, and it looks like its getting ready to put out a bunch of new blossoms. Happy.
.
Gulf Fritillary
On my morning garden walk today I went to check on my privacy trellises. Every few days I like to check the vines and encourage the little tendrils to reach up to the next row of wire. This morning on my passion flower vine I spotted two caterpillars!


I looked them up in my butterfly reference book* and found out they are the Gulf Fritillary caterpillar, which dines on the passion flower blossoms. (I think that even though the shades of orange are a little different, they are both the same type, just at different maturities. I "think.") I also found a photo in the book of what the butterfly egg looks like, and went back outside to see if I could see any one the vine. Yes! I snapped a few photos, but they are too tiny to photograph.
Here's what it will look like as a butterfly:

I love that the butterflies have found this plant already - they were one of the the reasons I chose that plant. Happy.
.
Tuesday, May 29, 2012
Privacy Trellis - It's Growing!
Hi! I just wanted to show you how the privacy trellis vine growth is coming along.... the passion vine is really happy!


The vines are already almost as high up the wires as I am tall! I do love it when a plan comes together.
How did we get here? Read the four prior posts on this project:
April 2nd
http://my1929tudor.blogspot.com/2012/04/privacy-trellis-construction-begins.html
April 2nd:
http://my1929tudor.blogspot.com/2012/04/trellis-post-caps.html
April 24th:
http://www.my1929tudor.blogspot.com/2012/04/sideyard-privacy-trellis-project-done.html
April 17th:
http://www.my1929tudor.blogspot.com/2012/04/privacy-trellis-progress-update.html
I had to replant the honeysuckle, and re-string the lines for it - I got that done on Sunday. Another post...
Monday, May 21, 2012
Finally -- Ready for Planting!
My newly expanded front beds are ready for planting! That was my number one goal for this weekend - and despite a rather reduced weekend time frame, Red and I got it done on Sunday. Yay!!
Friday night we stayed up much much too late - and Saturday morning we set the alarm for 6 to be at Living Earth Technologies by the time they opened at 7:30 a.m. Translation: Great efforts were made to be there before a line formed (fail) and to get a jump start on supplies for the beds. (Fail.) I had called LIT on Friday about pricing for bagged compost and mulch. The lady was very patient, giving me tons of prices, and very informative about what the types were. Unfortunately, she failed to mention that they were sold out of all bagged product. Yes - we got up early, drove, waited in line, only to be turned away. I was unhappy. Okay, I was really grumpy. Should I have asked if they had it in stock? Perhaps. But in my defense, their website said it was available, and well -- if I were answering the phones, looking out the window at the supply yard -- I would have mentioned that the item the customer was inquiring about wasn't currently available. But hey - that's just me. I obviously do not work there. : )
Anyway -- I did some competitor supplier research, and Sunday morning Red met me at Redenta's with his truck. Redenta's carries the LIT products that I wanted to buy. Now the prices are a little higher per bag, but I get a 10% neighborhood discount and if you buy more than 20 bags, the price drops $1 per bag. And it's less than 2 miles from my house, not 12. So in the spirit of really wanting to finish the project, and continuing my efforts to support local, independent businesses, I was happy enough to buy what I needed there. And, they were able to sell me some soil amendments to fix my alkaline soil issue. And so 32 bags later...
 |
Soil Amendments   |
Almost immediately after unloading the truck we went to get lunch. : ) (I have a bad habit of getting caught up in projects on Sundays and not eating. Thank you to Red for reminding me that food really should be a priority - especially with the amount of labor we were facing...)
We tilled. We sprinkled. We raked. We bagged. We tilled again. We hoisted bags, emptied bags,trimmed trees and shrubs We located elusive sprinkler heads (without damaging any!) And, we did not encounter any snakes. And finally, we mulched extensively.
I don't know how many hours that took... but it was several. Then I edged and mowed... and...
Here's the left side:


It's difficult to see in this photo, and once again I neglected to take before and after photos, but I "raised the canopy" on that row of shrubs. I also did sort of a poor pruning job on that big rosemary bush...
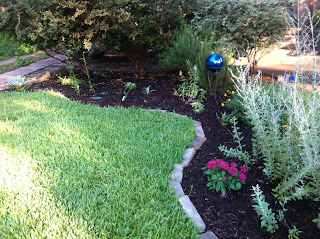
And then here is the right side:


I've since decided that I need to put the dark mulch around the tree base as well. I was going to leave it as is, but... no.
It's hard to describe how liberating it was to finally till and weed the back part of this bed. I'd been wanting to spiff up this bed for many months, but I knew that there were lots of pieces and parts to the project and that it would require substantial time. But it feels so. much. better. And the trees and shrubs will be so. much. happier. with the soil around them aerated and fertilized! There is still some hard work on this side remaining: I have a couple of sprinkler heads that need to be unearthed (see those 2 red flags?) -- they are both almost a foot below dirt level! And I still have the leak in the outdoor spigot pipe - that's under the window there. And, some labor but a fun end result -- I need to dig a hole for the water resevoir for my fountain! It will go somewhere in this bed. Okay, so I bought the fountain in OCTOBER. But I have changed my mind several times about where I want it -- backyard, frontyard, etc. -- so it's probably good that I didn't put it in place immediately! (Queen of Rationalization Crown firmly affixed.)
I really wanted to get plants in the ground as well, but I just plain ran out of daylight. And then I wanted to at least set them out in pots, staging them where I thought they might go, but honestly, I was worried someone would steal them. I know... that's irrationally crazy... but it's true. And really, I need to write down what plants I have, and their sun requirements, and how tall they will get so that I can give them their best placement. I hope to do that list today, and plant tomorrow evening. Theoretically the planting should go really fast because the soil is recently tilled and ready to go. Just make a hole, and drop them in. SO. EXCITED.
I also bought some supplies to make some really cool plant markers that will LAST. But that's another post. : )
This morning dog and I set out for our morning walk, and I'll admit: Stepping out into the front yard was akin to returning to the scene of the crime. But it sure did look beautiful out there -- and smelled yummy like great soil. : ) GEEK. Happy.
Subscribe to:
Posts (Atom)