Friday, May 20, 2011

Senna Alata - The Candlestick Plant

Candlestick plant lights up gardens summer through fall

I first saw this plant earlier this year when I started volunteering at the Butterfly House.  I didn't know what it was... but I immediately fell in love with it.  The blooms are huge and waxy and the plant looks so lush and tropical.  I've been reviewing the plant list of plants available at the plant sale this weekend, and was thrilled to discover that this plant will be there!  I am definitely going to buy one, and I think I'll plant it in my parkway where it will get full sun.

"This shrub attracts butterflies, birds, and bees" and it is purportedly easy to grow.  "The blooms themselves are not the only thing attractive about the plant, as it has very interesting foliage too. The leaves will remain opened wide during the day, but as the evening approaches, they close up like two hands coming together."

Continue reading on Examiner.com: Candlestick plant lights up the garden - Houston Gardening Examiner.com
http://www.examiner.com/gardening-in-houston/candlestick-plant-lights-up-the-garden#ixzz1MuZNXDkp

Wishing for Decomposed Granite

I thought I might get some decomposed granite for my backyard this weekend, but the weekend is shaping up to be too busy already -- and if I were honest with myself I'd admit that shoveling granite probably wouldn't be the best thing I could do with my (healing) sprained ankle.  But I really want the granite project underway.  Really.


Here's the general look that I'm going for:


My main purpose is to cover up dirt soil* until I can landscape everywhere. I remain thrilled to have all the grass gone out of my backyard, but am less thrilled when the soil becomes mud when it rains. I am not over the moon happy with the few paths I put in (cedar mulch over weed stop fabric) so I'll pull those up and redistribute the mulch into beds. I think the granite will provide a more cohesive look, and for the most part negate the need for paths.


I did make a couple of phone calls to suppliers about price and how far a cubic yard would go -- and did some rough calculations of how much space I have to cover. I think I need about 2 cubic yards, maybe a little more. I'm told one cubic yard of decomposed granite will cover 300 sq. ft. 1 inch deep (or 600 sq. ft. 1/2 inch deep -- look at me, doing math) I think something between 1/2 inch and 1 inch deep will serve my purpose.

Which brings me to a c-c-c-catch 22. The minimum delivery is 4 yards. The amount you can put in a back of a regular pick up truck is about half a yard, because it's so heavy. So, I can get 4 yards delivered and have nearly twice as much as I need (obviously foolish -- won't be doing that) or I can make 4-5 trips in a pick up truck. Ugh. But, as Red pointed out, the good news about that method is that by hauling 1/2 a yard at a time, I won't end up with more than I need. It's a lot of trips though. Maybe I can re-frame the driving time as labor breaks?  I am also going to check into truck rental at Home Depot -- maybe they have a larger payload than a personal pick up truck.

* Soil or dirt?  "Dirt" has sort of a negative connotation, doesn't it?  And "soil" seems more respectful and attended to.  Because I plant plants in it, and I want to nurture those plants, its better to project that I'm planting them into soil, not just sticking them in the dirt. 


Wednesday, May 18, 2011

Marigold Testing


Back in April I responded to a post on a gardening forum -- a seed company is looking for gardeners to test marigold seeds.  I responded, and it seems that I am "in."  Here's what I was told:
"This sums up what is happening with this trial. The seeds will not be mailed out until in the fall. The company initially wanted 5 varieties tested, then changed it to 14.  70 packages of seeds will be distributed and perhaps split some so that there is an even test in a number of home garden test sites.


The varieties to be tested are listed below in 2 groups : top group are our top marigolds; bottom group are competitive marigolds. I specify general preferences from the top group, like height, color if that is important to me, etc. and they will try to match that up with the competitive marigolds the company wants us to test against. Current thinking is that I will get an unopened package of 100 seeds of each variety of company marigolds that I request from the top group.
Plant as I normally do.


Based on a mini test (just 2 seed types) that is being done now, this is one method:


Specify 1ft by 1ft squares in my garden. 12 seeds will be planted of each variety in two ( 2 ) of these squares (24 seeds total for each variety). The 2 squares for each variety will be separated in different parts of the garden in case something happens in one of those squares. If something detrimental happens, I can replant from the remaining seeds. I will thin those marigolds down to whatever I feel I can handle and either transplant them or leave them in their squares. Hopefully at least 10 plants (maybe more) of each variety will remain for the final test. Of course labeling the plants (or maps) will be extremely important. Again you can do your test any way you want. I recap results and provide any info I get on growing marigolds successfully.


"This is a trial in real home gardens where issues arise, even total planting failures. All that is expected." 

Expect to see blankets of marigolds in my yard come Fall!  And, they encourage me to blog about the experience.  Fun...

Butterfly Plant Sale


This weekend -- Friday, Saturday and Sunday -- is the semi-annual butterfly plant sale at Texas Discovery Gardens at Fair Park in Dallas.  Through my volunteering at the Butterfly House there, I was included on an email last week asking for volunteers to work the plant sale.  I jumped at the offer -- and signed up for Saturday.  Last night was the volunteer orientation.  What I didn't know?  As volunteers we would have the opportunity to pre-shop.  Oh.  My.  Gosh. 

The evening began with an explanation of how the plant sale would operate -- customer traffic flow, different volunteer positions.  Then it moved on to what would be for sale:  16,000 plants.  Sixteen Thousand.  These are plants that a mere seven people started from seed since .... January.  You do the math.  We were asked to rank a list of volunteer positions as to which we preferred to do.

Next we were given a tour of the plants by Randy Johnson, Director of Horticulture, who of course is a Master Gardener (a life goal of mine) and who is the main man at Texas Discovery Gardens.   He had on old work boots, jeans, sported a pony tail and one of those straw pointy-topped Chinese hats that you see in rice paddy photographs.  I don't have to tell you that we all followed him around like ducklings behind the momma duck, slack-jawed.  I truly wished I had brought a dictaphone.  (And well yes, I have one, but just because it's an occupational hazard.  I have a laminating machine too, but that's probably another post.)  He would show us the seedling in a pot, and then take us to the garden area where that same plant was 2-3 years old.  Along the way he described the benefits of the plant (host or nectar) and if it was an annual, a perennial, or a native perennial.  All of them were caterpillar/butterfly friendly, obviously, and all of them were draught tolerant.  And the prices!  Rock bottom, baby.  And all organic.
Randy Johnson, Director of Horticulture, Texas Discovery Gardens

And then... we were turned loose with clipboards and plant lists to shop.  Not surprisingly, of the 20 or so volunteers, I was one of the last 2 people there.  If I could have spent the night I probably would have, despite the presence the purportedly very unfriendly black cat who has residence there.  When I left, the backseat of my little Mini was full of pots.  I don't know exactly where they will all be planted, but I'm betting that I'll bring more home after my shift on Saturday -- thank goodness I drive a small car.  More on the plants I bought in later posts...


Friday night is members only (but you can buy a membership!) and Saturday and Sunday the sale is open to the public.  Come on out!  http://www.texasdiscoverygardens.org/.  From the website:

Our annual Butterfly Plant Sale is back! Mark your calendar for Saturday, May 21, from 10 am to 2 pm. We have hundreds of herbs, perennials, host and nectar plants that will attract pollinators to your garden. We have gallon and 4-inch pots, as well as limited larger sizes. Members receive a ten percent discount and a chance to shop May 20, from 4 pm to 7 pm! You can buy your membership at the sale. Come early for a Plant Safari where you see established butterfly plants at Texas Discovery Gardens and learn about their light/water needs.

Tuesday, May 17, 2011

Sorry, but no.

I saw a Mockingbird eating my raspberries this morning.  He wasn't tentative -- he hopped on my fence, barely hesitated and dove into my raspberry canes.  I suspect it's been his morning routine for about a week now... which seems about the time that I last found a ripe raspberry.  I ordered bird netting this afternoon.  I'll share a lot of things with the birds, but my precious first-year raspberries are not one of them!

Nesting

Spring is prime nest building time for our feathered friends.  A couple of weeks ago I watched a Blue Jay tug with everything he had on a piece of old twine dangling from a roll up shade in my carport.  It reminded me how much fun I had watching birds the couple of years that I had put out nesting materials.  And then I promptly forgot about it.

And then Mother's Day and my mother's birthday came around, and while shopping for a squirrel-proof feeder for her -- the squirrels are getting the best of my parents' feeder -- I came across this Nesting Material Wreath for sale on Amazon:

Nesting Material Wreath
It is a pull apart wreath of nesting materials for birds. I ordered one for mom, and made a mental note to go buy materials to make one for my yard.

A quick Google search revealed this list of potential nest building materials.  It also listed things like small twigs and dried grass but since those items are, um, everywhere, I didn't see the need to include them in my wreath:


•Yarn
•Spanish moss (available in most garden centers)
•Dog hair (that's right, dog hair)
•Human hair
•Short strips of cotton fabric
•String
•Feathers

I bought a bag of feathers, a bag of Spanish Moss and 2 skeins of fluffy yarn on clearance.  Everything else on the list I had on hand.  I decided to use a wire coat hanger for the form.  After contemplating what the body would be made of, I decided not to pull the hanger into a circle, but to leave it in the traditional hanger shape. 

I cut off a sleeve of an old sweatshirt and fit it into the middle of the hanger.  Next I took some burlap, cut it into a long strip about 4 inches wide, and wrapped it around the hanger to hold the sweatshirt sleeve in place.  That gave the middle of the hanger some body.  Next I took some orange cotton string and a darning needle and did some loose zig zag stitching to hold the burlap in place.  Then I snipped some vertical slits in the burlap to create strips to tuck materials behind, so that the ends of the material would stick out for the birds to easily pull on.  

Now for the materials.  I went to my rag box and retrieved two old pair of cotton pajama bottoms and cut strips about 1/4 inch wide and 3 inches long.  I cut pieces of yarn 3-5 inches long.  I cut up the Spanish Moss into manageable pieces, grabbed some lint from my dryer lint catcher, cut up some bits of the orange string, and went to work.  I tucked materials in, and I also used a pair of tweezers to pull materials through the burlap.

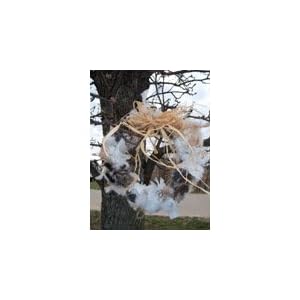
It didn't take terribly long, and this is what emerged:


I realized - bonus -- that the ends of the burlap strips would also be bits of string that they could use.  Sweet!  I liked it so much that I also made one for my friend in MN who sent me some potato "seeds" to plant this Spring (she had too many.)


Then my boss saw what I was doing... and said he wanted one -- that he had Cardinals  (I quote) "building nests this very minute" in his backyard.  Well!  Clearly time was of the essence!  I went to the office fridge, and hijacked the mesh bag that avocados come in:


This method was clearly the fastest -- literally took me about 10 minutes.  Any produce bag would work.  I had original thought about using a washable "delicates" bag from my laundry... but in the end couldn't quite part with one (and taking it back for laundry after nesting use... oh, I don't know, but um, no.)  In years past I have used the wire box that holds suet blocks; it works nicely as well and since it mounts on the feeder pole the birds find it quickly.  I have a bag of Clementines in my fridge at home -- I'll probably use that bag and make another materials bag for my backyard -- I have enough supplies to make a LOT of wreaths -- for the same price as one wreath already made!

I have mine hanging outside my front window next to my feeder:


I'll be watching for bright bits of things in bird nests in my yard!

Squid, swimming in the dirt


Does it look like a squid to you?  It does to me.  Okay, so it's in the dirt, not in the water, but  -- ?

I had a school of them in my backyard last night -- here is a photo of part of the school, doing some synchronized swimming:


What, you don't believe me?  Hmmph.  Well, okay, so these are my asparagus crowns!  I have 10 of them.  I had no idea what to expect -- I didn't know what they would look like.  And when they arrived and I couldn't plant them immediately, I followed the instructions to dampen the sawdust they were packed in and refrigerate.  I didn't really open it up to look at them. 

Last night I was finally able to plant them -- I had built the raised bed* for them on Saturday.  Loosened the dirt, added a couple of bags of compost, and let the soil rest for a few days.  (Okay, I let myself rest for a few days.)  Then I had to look up the planting method again -- I had forgotten, and got those babies into the soil.  Lots of water now, and you know I'll be checking every day for the little green fern like plants to sprout!


*  The bed will be replaced -- I just used some 2"x4"s that I had on hand.  I have the permanent metal corners that I was saving for this bed, but I didn't have the requisite cedar planks, and I really needed to get these planted, so I just made do with what I had for now.  It works.  It isn't beautiful, but it works.

Almost like the real thing

My neighbor threw out a length of old garden hose yesterday and I snatched it up.  I put a hose mender thingy (what do you call those?  I don't know...) on the cut end and affixed a sprinkler to it, screwed the other end onto my porch rain barrel:  wa-lah!  I can now reach to water all of my raised beds with my rain barrel water without filling a watering can!  It's almost as good as real rain:

I had the hose mender -- probably $1.99.  I also had the sprinkler in the garden shed -- it was an ancient one.  The hose, free.  The water, free.  (Unless you count my initial investment of gutters and barrels...)

On my water spigot on the back of house I had 2 unbelievably long hoses adjoined and I could reach all the way to the alley with it - that's sort of crazy.  I took one of them off, and attached it to one of the carport rain barrels.  Now I can water the back half of my driveway mint, and several other plants with water from that barrel.  I can now water all but the very back corner of my yard with rain water without toting a watering can.  HAPPY.

Now I need some hose hangers to wrangle all those hoses...

Two friends/neighbors who were over last night, helping me brainstorm ideas for my backyard are making noises about getting rain barrels.  That's a happy thought.


Monday, May 16, 2011

A couple of random items...

The buckwheat I planted as a cover crop in the backyard is in full bloom -- pretty and functional...  I don't know how long it blooms...


Along the topic of cover crops and preventing erosion, I am planning to have a load of composite (crushed) granite delivered soon.  I need to figure out how many yards I need, and I really need my sprained ankle to totally heal before I start heaving shovels full of granite around the yard!   The miminum commercial delivery is 4 yards... and/but due to the weight, the most a private pick up truck can haul is half a yard; I expect I would need a minimum of 4 trips with a pick up truck; not efficient.  I plan to spread it thinly everywhere that is currently dirt.  It looks nice, it packs in easily, and when I'm ready to plant in an area where it is I can just rake it back.  I'm a bit weary of mud... I think it will really change the overall face of my backyard, too -- and make it all feel more pulled together.  At least, I hope. 

This oak tree is a gift from my neighborhood squirrels.  Usually I yank them out because there are SO many of them, but this one is in a good location along the side fence; I'm going to try to keep it.

I've been researching fruit trees to plant in my parkways in the front.  Among the options is a peach tree... or a honey jar jujube (here's an article...  http://www.texasgardener.com/pastissues/janfeb08/Jujube.html), a 4-in 1 grafted apple tree, or an olive tree!  Doesn't that sound fab??  I did some reading about how to brine olives and it doesn't sound difficult.  Time consuming, but not difficult.  I am still considering a hardwood -- I figure my huge pecan tree will be gone someday and I want to have a replacement "up and coming" but I am also trying to only plant edible plants*, or plants that produce something edible -- so now I am undecided.

I am pretty sure I'd like a Celeste fig tree for the backyard somewhere. They are a pretty tree and everything I've read says they are easy to grow in Texas -- and fresh figs!  I'd like to thank Dallas Fruit and Vegetable Grower for helpful advice!  http://www.dallasfruitgrower.typepad.com/

*  Coming up -- I'll tell you about a great book on that topic that I bought this weekend...

Backyard Butterfly Area

This year I started a second butterfly flower bed in the back, and I started it entirely from seed.  Nothing is blooming yet, but several plants have buds.


It will be fun to see what all is growing -- it was a huge packet of "butterfly mix" flowers, and I don't know what all was in it!  This bed is immediately adjacent to the front yoga platform -- I hope to see butterflies fluttering around me...

On a related note, the Texas Discovery Gardens is having their butterfly plant sale 21st.  I'll be volunteering at the sale, and likely coming home with a car full of plants... Uh-oh!  More details here:  http://texasdiscoverygardens.org/

Raised Beds Producing...

Here's an update of my vegetables in my raised beds... the photos of the squash blossoms are my favorites!

Jalapenos!

Cucumbers on a trellis -- a new method for me...


My first tomato (literally in 3 years of attempts...)

One of my last radishes...

Kale ready for harvest!

Yellow squash blossom
I didn't take this photograph a night although it looks like it to me.  The plant's huge leaves provide such a colossal canopy that it's nearly dark underneath them.  It's just gorgeous to me!


Yellow squash blossoms open