
Wednesday, April 18, 2012
Tuesday, April 17, 2012
Privacy Trellis Progress Update
Red and I got the trellis poles set in the ground last week. I went out this morning and tried to wiggle the posts and they feel pretty sturdy despite the height and diameter of the pipe. Yay!
How did we get here? Read the two prior posts on this project:
http://my1929tudor.blogspot.com/2012/04/privacy-trellis-construction-begins.html
http://my1929tudor.blogspot.com/2012/04/trellis-post-caps.html
We* dug the holes 20-21 inches deep on Tuesday, and then mixed the concrete and set the poles on Wednesday. We learned in an unfortunate way where the sprinkler line runs -- can you guess what that means? (And then I got a short sprinkler line repair lesson. That will come in handy since I had attended a workshop on that which was a "fail" and my system definitely needs some love.) As a result of that encounter, we moved the poles a foot further away from the house - now they are up against the cement wall or "curb," which is sort of where I wanted them anyway...so I guess that worked out all right.
We mixed the concrete one bag at a time in my happy orange wheelbarrow. Then we put a handful of stones in the bottom of each hole, put a glop of concrete on top, and stuck the poles in. We used a level to get them straight in both directions, and topped off the holes with concrete. We also strung one line of wire between each set of poles as a guide for sinking them the same depth.
When we finished we agreed that it all went a little too smoothly, and wondered what we did wrong... LOL
 |
| Livingroom window trellis poles |
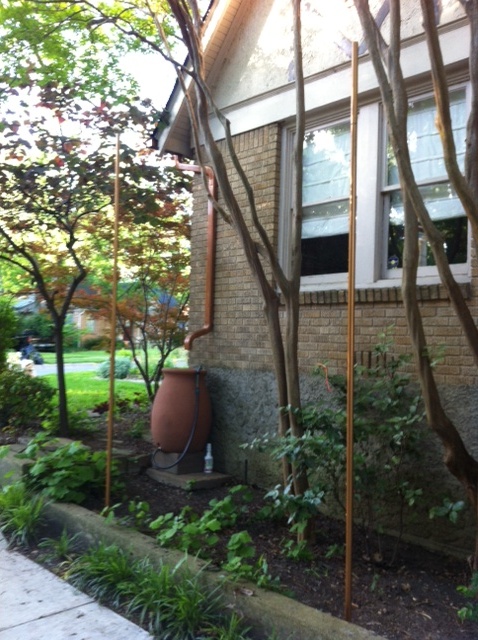
It's difficult to tell from this photo angle, but the poles are set in a width that is one foot wider than the set of windows. And then they go a foot taller than the middle of the window. My house sits quite a bit higher than the neighbors' house, so I literally look down on them; that's why I gave the trellises such extreme height -- 11 feet!
 |
| Dining room trellis poles |
In the photo above, if you look closely at the height of the foundation, you can see the orange string tied on the one guide wire. I thought we'd better mark it so that nobody strangles themselves with it before the rest are added and they are more obvious! (Also in this photo: Unfortunately you can see that I need to clean the brick in the outcropping corner - it got discolored from rain, pre-gutters. Waaah.)
I am really pleased with the color of the poles - after trying two different paint colors my goal of matching my gutters was met...
 |
| First vine wire attached as guide wire |
The lines for the vines to grow up will be attached by wrapping around these bolts, and then we will tighten the bolts to hold it in place. Which way we'll wrap the wire (which is actually braided fish line that will support 65 lbs) is up for debate. We talked about alternating it front and back, and not alternating it at all, and we talked about not going around the pole... I guess I won't know for sure until it's time to string them... I plan to get that done this weekend, along with prepping the new beds between the poles.
I am going to try to remember to do the bed prep before I string the bottom lines - otherwise I'm sure I'll mess up the bottom lines with my shovel and pitchfork. I could use my tiller, but I am afraid of the aforementioned sprinkler lines... even though now I do know exactly where they are and how deep they are. Theoretically it would be safe to till.
And then the fun part - the planting! I have emailed with Randy Johnson at The Butterfly House at Texas Discovery Gardens, inquiring about vines that are green all year round and that attract butterflies and hummingbirds. He suggests these two, with an aside about crossvine:
 |
| Photo Credit: http://www.treknature.com/gallery/photo206219.htm |
Lonicera (honeysuckle) both the coral and yellow: attract hummingbirds and are evergreen.
 |
| http://allthedirtongardening.blogspot.com/2012/01/honeysuckles-are-lonicera-love-them-or.html |
 |
| http://elmostreport.blogspot.com/2008/05/yellow-honeysuckle-lonicera-flava.html |
Crossvine (trumpet vine): it is evergreen and hummingbirds like it but it can get aggressive.
I am definitely skipping the crossvine - I've dealth with it before and indeed -- aggressive is a good word for it...
I also thought about jasmine - because it is evergreen and the blossoms are so fragrant; but it doesn't attract butterflies or hummingbirds, and I have it in my backyard in two places already anyway...
Ironically, before I looked up the common names of the two suggested vines (which I did just now), I had asked a friend for some slips from her passion flower vine -- not knowing I'd be in the market for it this weekend. She came over last night and brought me 5 cuttings... how's that for fortuitous timing? And another neighbor/friend has an alley fence covered in yellow honeysuckle -- I'll ask her if I can take a few slips from that. I may buy a few established plants as well -- I'll price them and weigh my impatience... :::grin::: I'm really excited to learn that I can continue my front yard theme of blue/purple and yellow/orange blooms and follow Randy's recommendations. I think the passion flower is just gorgeous!
Once planted, these vines are going to be the most pampered vines in my yard - they have a daunting task ahead of them. I'm extra happy that I have a rain barrel close to each of the trellises: bonus. Realistically I don't expect them to even reach window height this summer, but who knows? Maybe they are really fast growers - I don't know. Time will tell.
* Okay, so it was mostly Red. He told me I was wimpy with the post hole digger. But hey! At least I own a post hole digger, right??
Monday, April 16, 2012
Run for your Life!
Last weekend Red and I were working in my backyard on a project (yes, I know, this story is beginning like many others do...) Not unlike the Yellow-Crowned-Night-Herons that attempt to take up annual residence in my neighbor's yard, I heard it before I saw it. My head whipped around, my eyes frantically searching for what was making the sound before whatever it was found me -- and I spied it, flying right for me -- eye level, bottom heavy -- I shrieked and ran, tripping on a loose brick on the way -- and then it landed in my wet paint:

It was as large as my thumb - clearly nearly too bottom heavy to fly horizontally, and perhaps too large all together to be airborne.
I tentatively circled it. Stared at it, got brave and moved closer and photographed it. Wondered what in the heck was in my yard now?
I emailed the photo to Randy Johnson at Texas Discovery Gardens. He fowarded my email to John Watts (Insect Specialist / Entomologist) at the Gardens. And here's the reply:
This is a Eyed Elater, Alaus oculatus, a type of click beetle. Adults may take some nectar and plant juices. The larvae are predatory, eating grubs of wood-boring beetles like cerambycids (longhorns). They are active from April till June.
He makes it sound so benign.
A Bit of Functional Fun
Spring is here, and Summer is definitely coming. The yard work sun hats have made their reappearance for the season. Last year they spent the whole Summer lounging all over my house as though they had no place to be -- and well okay, they didn't - I should be so lucky!
This year I have corraled them:

I put a small nail in the crown molding near the ceiling and looped a piece of twine over it. Then I added sun hats with clothespins... slightly overlapping them over each other to hide the clothespin - well, except for the very top one. Wa-lah! Tidy hats and some fun color for a neglected slice of wall. The whole thing makes me a little more giddy than it should. I do love simple solutions!
I Know! Don't Faint.
This post is a week past due - but things have been crazy busy...
Don't faint, but I got the door frame for the inside of my bedroom installed:

Ignore all the peripheral items in the photo...
I am so pleased with how it looks - to me, after looking at raw 2x6s for months, it makes the doorway just disappear. Next up is pulling the baseboards off, removing the sheetrock behind them (you can see the strip of white at the top of the baseboard in the photo), adding a strip of crown molding at the ceiling, and finishing out the corners where they meet the sheetrock.
Oh -- and ordering the $500 sliding door hardware... there is that... but hey! Progress!
Subscribe to:
Posts (Atom)