Showing posts with label privacy trellis. Show all posts

Wednesday, May 30, 2012

Honeysuckle for Privacy

Did I tell you the honeysuckle plant on my first privacy trellis bit the dust?  And that I had a bit of a "dust up" with the nursery from whom I bought it?  It's too long of an uninteresting story of frustration that I prefer to leave behind, so suffice it to say that I had to go buy another honeysuckle.  I did not return to the same nursery...

So the new one looks like it is going to have both yellow and coral blossoms on it - I swear I saw both on it when I bought it.  That would be really cool.  I planted it on Sunday, and re-strung the lines that I had to cut to pull out the old honeysuckle.

Here it is in place:

It's sort of hard to distinguish it from the shrub behind it...


And here it is, between the poles.  The wires (fishline) are blissfully invisible.  Blissful, that is, until you forget they are there, and you almost walk into them.  Not that that has happened to me, but it could be cautionary tale.


It's gotten a late start compared to the passion flower vine, but I have high hopes.  It gets great morning sun.  I looked at it this morning, and it looks like its getting ready to put out a bunch of new blossoms.  Happy.


.

Gulf Fritillary

On my morning garden walk today I went to check on my privacy trellises.  Every few days I like to check the vines and encourage the little tendrils to reach up to the next row of wire.  This morning on my passion flower vine I spotted two caterpillars!


I looked them up in my butterfly reference book* and found out they are the Gulf Fritillary caterpillar, which dines on the passion flower blossoms. (I think that even though the shades of orange are a little different, they are both the same type, just at different maturities. I "think.")   I also found a photo in the book of what the butterfly egg looks like, and went back outside to see if I could see any one the vine.  Yes!  I snapped a few photos, but they are too tiny to photograph.

Here's what it will look like as a butterfly:


I love that the butterflies have found this plant already - they were one of the the reasons I chose that plant.  Happy.

* Here's the book I have:  http://www.amazon.com/The-Life-Cycles-Butterflies-Maturity/dp/1580176178/ref=sr_1_1?s=books&ie=UTF8&qid=1338393078&sr=1-1#_

.

Tuesday, May 29, 2012

Privacy Trellis - It's Growing!

Hi!  I just wanted to show you how the privacy trellis vine growth is coming along.... the passion vine is really happy!


The vines are already almost as high up the wires as I am tall!  I do love it when a plan comes together.


How did we get here? Read the four prior posts on this project:

April 2nd
http://my1929tudor.blogspot.com/2012/04/privacy-trellis-construction-begins.html


April 2nd:
http://my1929tudor.blogspot.com/2012/04/trellis-post-caps.html


April 24th:
http://www.my1929tudor.blogspot.com/2012/04/sideyard-privacy-trellis-project-done.html


April 17th:
http://www.my1929tudor.blogspot.com/2012/04/privacy-trellis-progress-update.html


I had to replant the honeysuckle, and re-string the lines for it - I got that done on Sunday.  Another post...

Tuesday, April 24, 2012

Sideyard Privacy Trellis Project - done!

Yippee!  The privacy trellis project is complete!  Red and I finished it several days ago, but I've just been too busy to pull a blog post together.  I am several posts behind... Spring is busy.  That's my only excuse...

We got the trellis wires strung, the plants planted, the weeds pulled, and the mulch spread.  I even planted a packet of seeds that were touted to be a "shady mix"  that I had on hand from last year.  I am so pleased with how it all turned out!   For your viewing pleasure...

Here is the path leading out of my pedestrian gate, towards the street:

In the far left of the photo you can see the Amaranth at the base of the tree -- planted by someone before me.  A bit further on you can see one of the 5 Yew shrubs that I planted last fall.  Bright green tips tell me that it's really happy - all 5 are growing really well.  Yay!  And on the right are the yellow and white iris from my friend over in Tarrant County.  They have done their blooming for the season.  And then those 2 little bumps of green sticking up along the curb are the passion flower vines, before they were spread out and twist tied to the wires.

And here is the view of the path a little further on, (taken a few days later) still walking towards the street:


Isn't it a pretty little walkway?  In the forefront of that photo you can see the backside of the trellis with the purple passion vine on it - here is a photo of the front side - standing in my neighbor's driveway:

In this photo you can see that I've spread the vines out, and twist tied the first tendrils to the wires.  It is already starting to reach up to the next wires!  By design, you can't see the wires, but they are every six inches, all the way to the tops of the poles.  The vines also have the added (immediate) benefit of shielding my air conditioner from view.  An unanticipated bonus for everyone...

And then as you are facing that trellis, to your left is the honeysuckle trellis:

That is all one big plant - it is over 5 feet tall.  It is a little sad looking in this photo, (and the lighting doesn't help any) but it is starting to perk up.  I called the nursery, and I think in my attempts to really pamper it, I over watered it.  They advised to back off on the watering, and if it doesn't come back, they said they will replace it.  (But I bought their last yellow honeysuckle, so I'm not sure exactly what would happen.  Hopefully we won't have to find out, because I really don't want to have to un-trellis it and dig it up!)

My neighbors whose driveway runs alongside this said they liked the new look, and among other things that it looks like a "secret garden."  That's exactly what I was going for - a path to a secret space.  Wasn't that kind of them?  I really am glad they like it, because they drive past it several times a day.

It feels good to have stepped up this side of my house.  Other than adding rain barrels and planting the yew last year, I really hadn't done much over here in the nearly 3 years that I have been in the house.  I still want to add these - in an amber color, back in the corner; they will address some feng shui deficiences by adding some light:

Photo/idea credit: http://www.theartofdoingstuff.com/glowing-orbs/
So now I'll pamper these little vines -- hand water with rain water, and feed them, and help them reach for the next rungs of wire... and wait for the butterflies to arrive.

Tuesday, April 17, 2012

Privacy Trellis Progress Update

Red and I got the trellis poles set in the ground last week.  I went out this morning and tried to wiggle the posts and they feel pretty sturdy despite the height and diameter of the pipe.  Yay!

How did we get here?  Read the two prior posts on this project:
http://my1929tudor.blogspot.com/2012/04/privacy-trellis-construction-begins.html

http://my1929tudor.blogspot.com/2012/04/trellis-post-caps.html

We* dug the holes 20-21 inches deep on Tuesday, and then mixed the concrete and set the poles on Wednesday.  We learned in an unfortunate way where the sprinkler line runs -- can you guess what that means?  (And then I got a short sprinkler line repair lesson.  That will come in handy since I had attended a workshop on that which was a "fail" and my system definitely needs some love.)  As a result of that encounter, we moved the poles a foot further away from the house - now they are up against the cement wall or "curb," which is sort of where I wanted them anyway...so I guess that worked out all right.

We mixed the concrete one bag at a time in my happy orange wheelbarrow.  Then we put a handful of stones in the bottom of each hole, put a glop of concrete on top, and stuck the poles in.  We used a level to get them straight in both directions, and topped off the holes with concrete.  We also strung one line of wire between each set of poles as a guide for sinking them the same depth.

When we finished we agreed that it all went a little too smoothly, and wondered what we did wrong... LOL

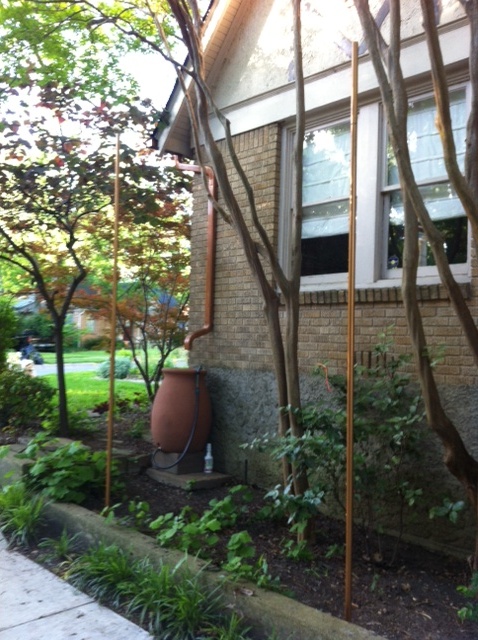
Livingroom window trellis poles
 It's difficult to tell from this photo angle, but the poles are set in a width that is one foot wider than the set of windows.  And then they go a foot taller than the middle of the window.  My house sits quite a bit higher than the neighbors' house, so I literally look down on them; that's why I gave the trellises such extreme height -- 11 feet!

Dining room trellis poles

In the photo above, if you look closely at the height of the foundation, you can see the orange string tied on the one guide wire.  I thought we'd better mark it so that nobody strangles themselves with it before the rest are added and they are more obvious!  (Also in this photo: Unfortunately you can see that I need to clean the brick in the outcropping corner - it got discolored from rain, pre-gutters.  Waaah.)

I am really pleased with the color of the poles - after trying two different paint colors my goal of matching my gutters was met...

First vine wire attached as guide wire
The lines for the vines to grow up will be attached by wrapping around these bolts, and then we will tighten the bolts to hold it in place.  Which way we'll wrap the wire (which is actually braided fish line that will support 65 lbs) is up for debate.  We talked about alternating it front and back, and not alternating it at all, and we talked about not going around the pole... I guess I won't know for sure until it's time to string them... I plan to get that done this weekend, along with prepping the new beds between the poles. 

I am going to try to remember to do the bed prep before I string the bottom lines - otherwise I'm sure I'll mess up the bottom lines with my shovel and pitchfork.  I could use my tiller, but I am afraid of the aforementioned sprinkler lines... even though now I do know exactly where they are and how deep they are.  Theoretically it would be safe to till.

And then the fun part - the planting!  I have emailed with Randy Johnson at The Butterfly House at Texas Discovery Gardens, inquiring about vines that are green all year round and that attract butterflies and hummingbirds.  He suggests these two, with an aside about crossvine:

Passiflora caerulea (passion flower):  an evergreen vine that hosts the Gulf and Variegated fritillaries.

 Photo Credit:  http://www.treknature.com/gallery/photo206219.htm

Lonicera (honeysuckle) both the coral and yellow:  attract hummingbirds and are evergreen.

http://allthedirtongardening.blogspot.com/2012/01/honeysuckles-are-lonicera-love-them-or.html


http://elmostreport.blogspot.com/2008/05/yellow-honeysuckle-lonicera-flava.html

Crossvine (trumpet vine): it is evergreen and hummingbirds like it but it can get aggressive.

I am  definitely skipping the crossvine - I've dealth with it before and indeed -- aggressive is a good word for it...

I also thought about jasmine - because it is evergreen and the blossoms are so fragrant; but it doesn't attract butterflies or hummingbirds, and I have it in my backyard in two places already anyway...

Ironically, before I looked up the common names of the two suggested vines (which I did just now), I had asked a friend for some slips from her passion flower vine -- not knowing I'd be in the market for it this weekend.  She came over last night and brought me 5 cuttings... how's that for fortuitous timing?  And another neighbor/friend has an alley fence covered in yellow honeysuckle -- I'll ask her if I can take a few slips from that.  I may buy a few established plants as well -- I'll price them and weigh my impatience...  :::grin:::  I'm really excited to learn that I can continue my front yard theme of blue/purple and yellow/orange blooms and follow Randy's recommendations.  I think the passion flower is just gorgeous!

Once planted, these vines are going to be the most pampered vines in my yard - they have a daunting task ahead of them.  I'm extra happy that I have a rain barrel close to each of the trellises: bonus.  Realistically I don't expect them to even reach window height this summer, but who knows?  Maybe they are really fast growers - I don't know.  Time will tell.


*  Okay, so it was mostly Red.  He told me I was wimpy with the post hole digger.  But hey!  At least I own a post hole digger, right??

Monday, April 2, 2012

Privacy Trellis Construction Begins

With prime Spring planting time upon us, Red and I got started on the construction of my privacy trellises.  My house sits on considerably higher ground than my next door neighbor, and I feel as though I am towering over them, looking down at them.  I actually am looking down at their driveway - and we are friends and they claim they don't feel like I am looking out at them all the time, but nonetheless, we agreed some privacy screening would be nice.  The trellises will provide the extreme height that is needed, and also will be quite narrow - perfect for the sideyard.

We are building two; one to go outside my dining room windows, and one to go outside my living room windows.  If they turn out as fab as I expect, I will likely want one at the end of my porch as well, but probably using cedar 4x4's as in the photo below instead of pipe.

I dreamt up the design for the trellises by looking a ton of trellis photos and privacy screens online.  Ultimately this design became the basis for my design:

Photo Credit: http://www.oclandscape.com/ocblog/archives/work_in_progress/index.html
Mine will be out of galvanized fence top rails, painted (copper color) to match my gutters, set in concrete, with braided fishing line (it's green!) strung between the posts.  Mine will also be an astonishing 10 feet tall...

And so we begin.

First, I scrubbed down the pipes with detergent to remove the oily coating.  I rinsed them, and dried them, in preparation for priming for painting.


Next I brushed on primer.  I had primer especially for galvanized metal left over from my corrugated pipe project. (You can read about that here: http://my1929tudor.blogspot.com/2011/06/splash-of-color.html )
I bought the primer in a gallon can at Sherwin Williams.

Here are the pipes primed, and clamped down for the next step:


Next we marked off the bottom 20 inches, which is the portion that will be sunk underground in concrete.  Then we marked off every 6 inches up from that.  Each six inch mark will be a row of fishing line strung between the posts for vines to climb on.  We marked the lines, with a hash mark to mark the middle of the pipe:


Red drilled a hole into the pipe (not all the way through to the other side, just through the top side) and I followed behind him with self tapping screws.  His drill hole was just slightly smaller than the screw diameter for a tight fit.


I didn't screw the screws in all the way - allowing us to later wrap the fishing line around the screw post, and then screw it in the rest of the way to hold it tight.  This will also allow us to paint the screw heads when we paint the posts:


We then took a 5th length of pipe and cut it into lengths to add to the 4 posts to increase their lengths to 10 feet (above ground length.)  I forgot to take photos of that step...

We brushed off the metal shavings, smoothed the cut ends with a file, spot painted primer on a few new spots of raw pipe, and began spray painting the copper colored paint:


You can see that by that time we needed a cold beer... but hey!  I can multi-task...  : )

It turned out that the paint color is too orange.  I completed one coat of it for consistency, and I'll need to go buy a different color and go over them again.  The color the pipes are now would make everyone at UT very happy...

New paint color tonight, and then hopefully installation sometime this week! 

So far, so good.  The next challenge will be to get them set into the ground so that the holes and ends of the posts line up with each other.  We've learned that my house is notoriously not square, and I know that my yard is sloped...

And then we will learn the answer to the great debate of whether or not we will need a cross post for stability. I'm hoping we do not, as it would take away from the very clean look.  I guess we will find that out when we start installing the fishing line supports.  Up on ladders... with fishing line, scissors and a drill... We could probably sell spectator tickets for that day!

But overall?  I'm very excited.  I need to start thinking about plants.  I know I want jasmine, as it blooms and it is green year round.  I'm also thinking of Dutchman's Pipevine which is a host plant for butterflies.  I think I would have to order those plants online, and I don't know if they would be evergreen in my climate.  Must do evergreen vine research this week!

Also coming up - brainstorming for the pipe cap design.  Stay tuned.