I had a great weekend in the project department this weekend! I dabbled around with a variety of projects, just enjoying that I didn't have anywhere that I needed to be. Even the cold didn't deter me this weekend! Not sure what that is all about.
Saturday Red and I went and bought plywood for our Habitat for Humanity sign that we build every year for the Dallas Bar Association's build. I found a piece of 1/4" plywood at Home Depot that was damaged, and negotiated a half price deal on that. Score! We also picked up a fence post for support, and some rope for ... dreadlocks. I know - sounds weird. The house street name is "Jamaica" so I'll leave it at that for now. More details as construction progresses. We have to have it ready by Saturday, March 3rd so it won't dangle too long.
Then I puttered around with a Valentine project.... I'll write that post next...
And THEN I picked up on the infamous door frame project. I worked on it briefly last week but didn't make enough progress to merit a post. After this weekend I have the first three pieces of wood up that form the doorway itself (I always struggle with terminology -- is that the door frame? The door jamb?) installed. I was short one stained piece, so I stained that Saturday and installed it on Sunday. Then yesterday I was holding up the pieces of door trim to see where they would fall width-wise. and realized that I needed to sand off the bead of old glue (?) where the edge of the fabric for the vapor barrier had been affixed. The trim wouldn't cover it up, but it would be difficult to sand it off once the trim was in -- too close to have room to work. Here is a work-in-progress photo on that:

(I'm sanding off the white vertical line.) Once finished, the sanded area didn't look much different than the surrounding areas, so I think when I oil the wood it will disappear all together. At least I hope... The sanding didn't take as long as I expected it to, and I was doing it manually with a 100 grade sandpaper. I have an electric rotary sander, but I knew that would kick up a ton of dust and I wasn't willing to drape everything for that small project. When I was done sanding I wiped the area down with a damp rag.
Also in that photo you can see the edge of the door frame installed. I neglected to get a full-on photo of that.
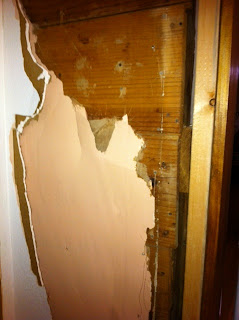
I also had one remaining area of sheet rock to remove -- it was behind my shoe shelving, and I got that removed:
Here is a photo of the sheet rock pulled down, revealing a layer of paper, and then the vapor barrier fabric peeking out behind that. I don't know if the paper is just some other layer of materials that served some obscure purpose (let me know in the comments if you have a guess) or if it is just the world's most boring wallpaper...
Then I was ready to install the trim on the bedroom side of the wall. And that's where my day came to an end. I didn't get install the 2x6" properly, and now my trim will not lay flush. I was a little frustrated, but holding the trim up just to see what it will look like (fabulous!) was so exciting that the frustration took second place. Getting the first planks installed, and getting that hideous line of glue sanded off made such a huge difference visually that I was pumped up once again about the project.
I haven't decided how I will resolve my problem -- will I have to rip out what I've done, rip the planks narrower and reinstall? Can I use a planer and just shave off that 1/8 - 1/4" that is protruding? I don't know.
Also, I still need to make the plinths to go at the base of the trim... and I need to figure out what I want the finished top of the door trim to look like. I keep changing my mind about that. I think I need to go to the library and flip through some books of 1929 Tudor styles. I've read that the trim in that period is narrow and lighter, but I need more guidance than that!
Then since I had my compressor and nail gun in the house, I decided to throw some dividers into my silverware drawer. I loathe those plastic silverware trays -- plastic is gross -- and every time I open and close the drawer the tray slides around in the drawer. It just bugs me. So, this goes into the category of a quick and dirty fix, knowing that it is temporary (because really, how long can I resist ripping out those cabinets?) Here's how it turned out...
Not glamorous, but very functional -- but look at the drawer I started with -- even it has two or three different colors of paint on it! So this is an improvement for me; it just gives me a little mental space... Ohhhh, it's the little things, isn't it? : ) And the happiest part of all of that is that the plastic tray is in the "take to Goodwill" bag by the back door.
And, also in the kitchen -- I've discovered that a yoga mat* tucked under the fronts of my washer/dryer inside the laundry area doors is a stellar draft stopper. I also rolled up a little rubber-backed rug and tucked it down in front of the dishwasher... and I'm just going to say: My kitchen was a LOT warmer. Score one for the home team.


