Wednesday, December 2, 2009

Chain Link? Be Gone!


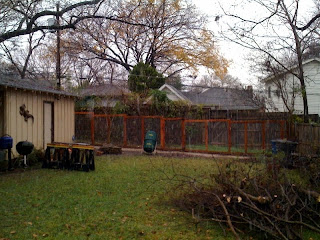
Those are some before and after photos of the alley fence...

I had my old fence lining the alley removed this week, and had a new one installed. The old one was too short (about 4 feet) not asthestically pleasing (chain link) and not in the best shape. It was patched with odd bits of mesh here and there, and totally overtaken with vines. Greta hadn't realized yet that she could jump it if she wanted to (and let's be honest, to what better place would she be going?) but she demonstrated her fence leaping ability at my old place so I figure it was only a matter of time.

I hadn't really planned on taking this project on until Spring when I plan to start landscaping and gardening in earnest. I knew I wanted it done before those projects started, so that my new plants wouldn't get trampled during construction...

Aside from being easier on the eyes and better security, I got 2 bonuses with this fence: One, I now have a gate to my alley. Okay, yes, the alley is abandoned -- you couldn't drive back there if you had to (just ask my cable guy) but I still need access for weed control... The second bonus is, just think how great that new wire fence will be for climbing vegetables in my garden! I'm pretty pumped.

Abe at the fence company (major kudos Top Quality Fence for a job well done) said my fence was sort of fun to do because it is different than 98% of the fences they install. You KNOW I loved hearing that! :::grin:::

I also was forced to clean up the myriad of clay pots and things behind the shed to make room for construction. The sellers had left several pots and bags of lawn chemicals (eeewww!) back there, and when I moved I just piled my pots on top of theirs. So that got all sorted out, and hey, I found a cement pad off the shed in in back! Shelving will go there, and it will be my place for re-potting plants. Plus it just feels good to have cleaned that out back there. It was sort of a yucky project hanging over my head.

Wednesday, October 28, 2009

Red Letter Day!!

As of last night -- October 27th -- my house is moving box free!!

Yes, I am DONE UNPACKING!!

Are there a few random things I haven't found? Yes.

Is everything in it's final resting place? Ohhhh, no.

Have I painted even ONE WALL a color other than white? No.

But -- I don't have any more boxes! Hip hip hooray! Hip hip hooray!


One more bulk pick up trash day and I will be doing QUITE the little dance.

Wait for it -- !


Okay, I am losing my mind -- I swear I took photos this morning with the closet doors OPEN as well, but now I can't find them. I will have to add those later.

At any rate, WA-LAH!! This is my new IKEA wardrobe closet! Talk about room changing... wow. And remember I said how easy it is to find all your clothes when they are right out in front of you? Wrong. Once I started organizing, I found things I had forgotten I had... and sorted through everything and have a huge Goodwill pile. Hurrah!

It's hard to tell in the photos -- I couldn't get a wide enough view to show the glorious TEN FEET OF CLOSET -- but there are two big sliding doors in the middle, and then on each end is a smaller cabinet with a hinged door. The hinged door on the right is a full length mirror. Inside are double hanging rods, pull out drawers, pull out baskets, shelves and a jewelry organizer.

And remember the original closet that is inset into the wall? The third section of the closet has a "pass through" back into that closet! We took out the one clothes rod and added a couple of huge shelves, so now I have storage for things like guest bedding comforters, rugs, huge stuff like that that I don't need to get to very often. Perfect! (We joked about making that my "secret panic room" for storms etc. Especially handy since it backs up to the wine rack on the kitchen wall on the other side... LOL but elected to keep it for storage.)

I had Blue Box Home Services through IKEA deliver (the boxes were unreasonably heavy) and install the closet. Turned out to be money well spent: It took 2 guys who install this stuff for a LIVING from 9:30 to 1:15 on a Saturday to do it. Tom and I would still be trying to figure it out, I am certain, and probably wouldn't be any too happy about it. There was lots of "shimming" going on underneath, because surprise of surprises, my floors aren't totally level! NO! Say it isn't so! LOL

So, now I feel like a big girl with a new closet. Ahhh. I'll post interior photos soon. And soon I'll be picking out paint colors and window coverings. YES! I'm very excited.

UPDATE: 10/29 -- here are new photos! One is blurry. Sorry.

Master Bedroom Closet, continued


Yes, this is really how I have been living in my master bedroom since June... eeeka. But I will say, it's easy to find your clothes when they are all visible and in front of you... The "dressers" that are painted (a final desperate act towards civility) are pieces of the livingroom entertainment center that was chopped out of the livingroom. The black plastic shelving unit is from work -- it's one of the units that I stack boxes on during discovery... (SO peaceful in the bedroom: WORK STUFF - NOT!)

So... you see why I haven't shared bedroom photos before?

Master Bedroom Closet - (we use that term loosely.)


This is what the inside of the master bedroom "closet" looked like when I bought the house. Actually this is an improvement -- before I started taking down the wallpaper, I had to remove I don't know HOW many sets of those white wire shelving units. They were covering every square inch (which admittedly is not very many inches) of this closet, including the inside of the narrow closet door. I gave away most of the shelving on Craig's List -- undoubtedly it made someone very organized -- but kept one wall unit to use in my workshop. The closet was 37 inches wide at it's widest part. T I N Y.

Tom and I lined the closet with cedar, and put in one clothes rod at the top for me to hang long dresses, robes and coats. In this photo, we had removed the very cute door with the crystal door knob in preparation for the closet addition.

As a side note, see the wood behind the wall paper? That's what's behind all of the sheetrock in my house! It feels really solid and it's awesome for hanging things on the wall -- you don't have to find studs!

Monday, October 26, 2009

The Pecans are In!


My elderly neighbor Chubby told that our neighborhood used to be a pecan orchard. She said house 2 doors down from me (and next door to her) was the original farmhouse for the orchard -- cool! It used to have wood siding and in later years it was bricked over. Christy and Carlos live there now -- (remember the snake wrangling story? That was their 6 year old daughter who is the snake wrangler!)

Anyway, I am new to having pecan trees IN my yard. They are old (presumably 80+ years) and beautiful. They are a constant source of sticks for me to throw for Greta, and their very abundant leaves are great for my compost barrel and for mulch for the lawn. And that's not even talking about the pecans they are dropping everywhere! Note to self: If you are walking in the grass without shoes, beware! It's like walking on marbles! And backing out of the driveway, the pecans under the car tires sound like a gun fight...

Anyway, my neighbors in the know tell me that the pecans are "in" e.g. they are down on the ground and ready for pick up and eating. I'm told this will continue for quite some time. Awesome! (I think...ask me again after pecan season is over.) I see lots of folks walking dogs with plastic grocery bags to put pecans in, and lots of folks in the park picking them up.

Sunday I took care of the front lawn and Tom came over before the Cowboys game and decided to try out my Nut Wizard (http://www.nutwizard.com/) for picking up the pecans. Sort of like vacuuming... Deluxe! He got nearly a 5 gallon bucket full of pecans! Then he took them indoors and cracked the exterior shell off of them, and here's the beautiful result. (Thanks for the great bowl, Kelly!)

It appears I will need to procure and nut cracker and a set of picks. I think my dad will love to sit on my porch and crack pecans! I am not a fan of pecan pie... or of pralines, so I am not exactly sure what I am going to do with them all. Do you want any?

As a side note, my neighbor Lynne has found a chestnut tree by the park! She showed me some chestnuts she picked up -- they looked perfectly polished and just beautiful! Maybe we'll try roasting some at Christmas... [sing it with me...]

Chimney Sweep


It's been a while since I've posted... My OCD requires that a project be totally done before I will post it -- and I have a few projects that have just a little thing left, and so while they are "almost" done I don't let myself post. I've been churning away on things though!

So my fireplace -- ! When I bought the house it was connected to a gas line with fake logs. So not my style; I like the real wood fires -- they smell good, they make fun crackling noises and of course I love messing with them...call me a pyro (but tell me you don't think that's fun too!)

When I had a plumber out to remove the little gas line stub ups in the floor from the old furnace, I had him disconnect and remove the gas line in the fireplace. But I wasn't confident that it would be safe to have a real fire in it, so I called a chimney sweep to come out.

Enter -- Doug of Black Hat Chimney Sweep. Once again, found him on Angie's List (which reminds me, I need to write up a favorable review for him...)

Doug added a damper -- how in 80 years nobody thought to add a damper is beyond me! (Hel-lo, there goes my air conditioning and my heat, up up and away through my chimney!) It looked enormous for the size of my fireplace, but apparently once you get past the firebox, the opening is 3+ feet wide.

He also confirmed that the brick is fire brick, e.g. it will withstand heat from a fire. Incidentally he said the fireplace has barely been used in 80 years -- the brick isn't even discolored! Amazing.

He also added a steel plate to block the opening between the two walls of brick: from my understanding, the exterior wall of brick that I can see in my livingroom below my mantle, and the wall inside the chimney. Apparently there was an opening between the two and flames could like their way up in between... could lead to a house fire. Good catch, Doug! Yikes.

He also climbed up on the roof and put new screen over the top of my two little chimney pots. He said the wire mesh that as up there was too fine of a weave for smoke to pass through. I do not understand how that could be, but then again I am not a chimney sweep either.

While he was up there he replaced a brick that had fallen off the tippy top of the chimney. (I was able to find a matching brick in the shed --- let's think about how long that had been there... again, amazing to me.)

Doug was awesome. He teased with Greta the whole time he was in the house (she was quite interested in all the aromas) and he even replaced a non-chimney chimney cap that had sailed off of my roof (frankly nearly hit me in the head like a frisbee) a few weeks ago. It covered up a furnace vent or someting -- not exactly sure -- but I figured it was serving some purpose and should go back up there.

Tom and I had gone to pick up some firewood the week before, so now I am ready! I figure the first fire will be Halloween weekend when my sister Janice arrives for her 2nd Annual Halloween Getaway. We'll see if the weather is chilly enough!

Anyway, for your viewing pleasure, here is a photo of Doug the chimney sweep. I warned him he would end up on my blog -- he was as good sport about it all. (That's the damper he's placing. It was wrought iron and weighed a ton!)

Wednesday, September 30, 2009

Come, sit on my porch


My street is part of a Conservation District -- among other things that means that I cannot make changes to the front of my house that are inconsistent with it's original design. e.g. I cannot enclose my porch. My house is the only house on the street that still has a porch! Because the houses here are small, most folks have enclosed theirs to make more living space indoors. Even though I am prohibited from enclosing mine, it's still awesome living space and I would never WANT to enclose it! I mean, just look at it! Lots of problems get solved sitting out here.

I have the big rag rug from mom and dad's family room on the floor. I have a vivid memory of flying from Minneapolis to Dallas, and this rug was my carry on. Yes, I carried on a 9 x 12 foot rug. The joy in the trip is that I was late for my flight and I had to run with this rug around my neck and over my shoulders through the MSP terminal. Let me tell you, if you want people to part a path for you, just run with an area rug through an airport. I have had this rug for over 10 years! I have used it in various places over the years, but sometimes it has just been folded up and stored under my sofa, because I couldn't bear to part with it. I knew that someday I would have a place that it would be perfect for.

Then I have the four big floor pillows. I made these years ago because I love sitting on the floor. The fabrics have a little bit of everything in them, so they always match something.

Then, recall from a earlier post the Smith & Hawken store closing sale? Enter the three copper "I Dream of Jeannie" citronella oil candles! Perfect for chasing off the mosquitos and giving a little bit of hazy light.

And then there is the wrought iron glider for those who don't want to sit on the floor.

I love to sit out here and read, sip coffee or wine, and watch the neighborhood go by. I'm trying to teach Greta to enjoy it too, but so far she insists on being on full alert when she's out there. You can imagine that isn't terribly restful -- but I'm hoping an old dog can learn a new trick.

Living by Lists


Everyone who knows me knows that I love lists. When things are really hectic, I actually have a list of my lists. I know, I'm a geek. But I am an organized geek! And since I am living in a perpetual project (happily) it will come as no surprise that I have a list of projects. Well, two lists: The Short List (mildly urgent) and The Long List (longer range.) The lists get re-written regularly -- partly because they get messy with things being crossed off, but mostly because the font needs to be smaller so that there is room to add things to the lists. This sheet of paper lives on the swinging door between the dining room and the kitchen. And if I ever wonder how I will spend my day, I just lean on the counter and contemplate the lists. Usually that leads to a trip to Home Depot. (Sometimes it leads to "Date Night" which can ALSO mean a trip to Home Depot. -- That's a little joke for Peggy!)

No need to point out to me that The Short List is longer than The Long List. Many have come before you. :::laughing:::

This would probably be a good place to add the "PayPal" link that BlogSpot offers. KIDDING.

Until next time,
Project Girl

Inspiration...


Those of you who have been paying attention may have noticed that I haven't posted anything about my master bedroom. There is a reason for that... and don't get excited, I am not posting any photos of it today, either.

But! This is a pillow I bought with Shannon in the Bishop Arts District on our day of shopping for things we didn't need while she was in Dallas. I got 2that are identical in this dreamy store called Bishop Arts Market. I have been trying to figure out how I want to decorate my bedroom, and this set of pillows is going to be the centerpiece for the inspiration. You can't tell by the photo, but the dark brown areas are velvet! It begs to be touched.

I am going for a organic spa feel. Here are some of my current ideas:

Paint one wall that caramel color and the other three walls one of the lighter colors. My bed head board would be on the dark wall.

Or, use 2 lighter colors and paint 2 walls each color. Curtains would be the caramel color.

Another thing I am doing for sure is making leaves the same shape as on the pillow out of wood, and paint them to look the same, and hang them on the wall. I'm thinking various sizes... probably without the branch.

And then I saw this wall in a store that is pieces of wood cut to look wavy, and painted. I'm thinking that could be really fun on some area... either painted or stained... The photo is sort of blurry -- sorry.

AND, I have a natural wood bamboo room divider that I could use in there somewhere.

I have no idea what color my duvet would be... perhaps a stripe in similar colors?

I'm going to do the built in wardrobe from IKEA along on wall.

If you have any ideas or suggestions, bring 'em on! And I'll report back how the project is progressing.

If they don't sell it in a store...


My livingroom isn't the largest room you have ever been in, it's true. You may recall it got a little larger when we took out the circa 1950's entertainment center. Not wanting to refill that same space with another television, I bought a flat panel to hang on the wall. Deluxe!

That left some space below the TV that was crying for a multi-purpose bench that you could sit on (duh!) with a shelf below the seat to put the TV components on. Great space saving idea, right? I thought so! But does anyone manufacture and sell such a thing? Apparently not. At least not that I could find. And so... faced with no other choice to complete my vision, we (Tom and I) built one.

I found a book called "2x4 Furniture," at Half Priced Books. It's full of fun little projects. The bench I selected is actually meant to be a garden bench, but with some cushions added and the nails/screws hidden away (pattern modification, thankyouverymuch) I think it looks just fine in my living room! I was worried it would be too "heavy" but so far I am pleased with it. And wonder of wonders, if some day I decide I don't want it in my livingroom, I can put it.... where? In my garden!

I still need to figure out how to hide those unsightly cables dangling down, but I'll get there. What do you think? Do you love it?

Front Door; Complete! (Philly Find #4)

Don't you find it fulfilling when you can cross a project off your list? My front door area has been "in progress" for a while... but I can cross it off the list now. First, there was the Norwegian welcome sign from my sister that was hung above the door. (Some family discussion ensued -- were we REALLY Norwegian?? Um, yes. Okay, are we more Norwegian than Finn? No. Ultimately I had to promise to hang up a Finnish welcome sign if one was found.)

Then, I found the stained glass in Philadelphia during that totally glorious girly weekend. I discovered when I got it home, however, that shockingly (not) the window opening in my door and the stained glass piece were not the same size. I stewed about the various ways to affix the glass to my door (rather daunting) and got several opinions. Then I happened to find myself with the piece on my person while in a stained glass gallery and the professionals directed me on what needed to be done. And then they told me how much they would charge me to do it for me... Literally -- they came to my house and installed it! Who knew?? They also added a bit of glass around the perimeter to size it up to the door window. The total bonus with that part was that they were able to add amber colored glass like the other pieces have -- and I totally love love love that color -- and it downplays the blue. Win! Win! (Win -- for the store...!)

And then, while I was very sad to learn that Smith & Hawken was going out of business, I was giddy at the really great blue pots I got for a song at their clearance sale. Okay, maybe not a total "song" -- but a sweet melody for sure. And, you know some realy great pots have the stamp inset on the terra cotta of where they were made and the year? These have that -- and included on the front is the year 2009 -- the year I bought my house! I'm enough of a geek that I think that is cool. Mine say, "G. Wolffe & Co. 2009."

My neighor saw the pots and immediately told me they would be stolen. She said she had some great pots and they were stolen. Hmmm... I emailed our Dallas Police neighborhood officer and asked if he agreed? He said I should "secure them the best I can." So, okay -- how do you secure pots to your porch? I mentioned this to the stained glass installation guy and he told me to get some epoxy and GLUE the pots to the porch. Really? Glue them? TO the porch? Interesting.

Fortunately for me, my partner in project crimes was flying in that same day! She truly did not bat an eye when I told her on the way home from the airport that we needed to swing by Ace Hardware to buy epoxy to glue pots to my porch. As if it was the most normal thing in the world to do on a beautiful afternoon when you haven't seen your dear friend in months. And let me tell you... you wouldn't think there was all that much to that project... until you see that the glue comes with a "mixing paddle" (the equivelant of those shoestring potatoes that come in a can -- not anything you could, say, power your kayak with) and that you must consider the logical order of things:

There is the pot. There is the 3 clay feet that support the pot. And then, obviously, the porch to which all that is affixed. Not to mention... I had already planted plants IN the pots -- so we could not flip them upside down. AND, because I have a bad case of OCD, everything needed to be centered against the columns around my door -- the pots, the writing ON the pots, and the 3 little feet. Yes... I will say it was good that there was two of us to muddle through the details! But you can see that we did a spectacular job! And I am pleased to say that it's now been 6 days -- 3 days of which I was out of town -- and the pots are still there. (I will not admit to you how many times I have gone to look to see if they are still there.) My neighbors say they are going to buy epoxy.


Monday, September 14, 2009

The Wonders of Craig's List


I really am grateful that my front yard came pre-landscaped. It's clear to me that someone, some where along the way put forth a great deal of time and effort to plant shrubs and trees. I do think, however, that perhaps they mis-judged how large some of the shrubs would grow to be; that is easy to do and I have done it just with plants in my past herb gardens. But I really love the architecture of the front of my house, and felt that some of the shrubs were obscuring it. The landscape designer I hired first pointed that out to me, and I have to say I agreed with him.

We discussed re-locating shrubs; saving them by digging them up and re-planting them elsewhere. But that proved to be cost prohibitive, and at least a few of them I had decided were always going to be too large, regardless of where I put them.

I didn't want to just dig them up and kick them to the curb, so over Memorial Day weekend I put an ad up on Craig's List saying that I had free shrubs -- all you had to do was come and dig them up. I got three interested parties, and while I didn't actually meet the guy who ultimately come and dug them up, he must have had quite the technique.

I put ribbons on 10 shrubs, designating them as up for grabs. (The ribbon I grabbed out of my closet happened to be yellow -- my yard looked like I was waiting for family member to return from war...) On the Tuesday he was to arrive, I was at work, but I knew one of my neighbors was home, so I asked her to shoot me an email if she noticed a man with a shovel show up in my front yard, just so I knew what to expect.

About 1:15 she emailed: "Man in white SUV in your driveway, putting the seats down. It looks like he'll be there a while!" The poor guy -- it was a hot day, he was alone, facing the task of digging up a lot of well established shrubs. I hoped he had brought water.

I headed home from work about an hour after that. I fully expected to arrive at home to a man digging in my yard. But no! He, as well as all ten shrubs were gone! I was stunned. It really looked like the shrub version of The Body Snatchers had been there -- all that remained was slight indentations in the earth where each shrub was.

It was quite the front yard transformation! I haven't planted anything there yet, but I plan to put my butterfly garden there. I already have a lot of hummingbirds who regularly visit the blossoms on my Turk's Cap that blooms next to the Pecan Tree.

You can also see in the "before" and "after" photos that the straggly tree that was in front of the porch is gone; I cut that down a few weeks ago. Again, I looked into relocating it, but it was several thousands of dollars to do that. I apologized to the tree profusely as I sawed it down! I felt badly, but it really had to go.

A Bit of Adventure in the Rain


We've been having quite a lot of rain here in Dallas the last few days -- glorious! We really need it. Despite not having gutters on my house yet, I was able to strategically place my two rain barrels to catch rain run off from the roof. One on my front porch, and one along my driveway. I had low expections for water collection -- I thought I'd collect maybe 4-6 inches in each barrel. HA! Boy was I ever wrong! In just one day, both barrels were over flowing! I now have 100 GALLONS of rain water stored for watering my plants. I'm giddy. (My postman may not be quite as giddy... he has to do a bit of fancy footwork to navigate around the rain barrel to get to my mail box -- and thanks to Ask.com I now know that 50 gallons of water weighs 417 pounds. No wonder I couldn't move the barrels when they filled up!)


What I am not so giddy about, however, is what happened to my 80+ year old pecan tree in my front yard. It's huge -- and laden with pecans (do you say "peh-CON" or "PEE can"? I often say "PEE can" just to make people twitch...) and apparently the combined weight of pecans and rain was too much for two particular branches. I don't know when exactly on Sunday that it came crashing down (or was it a slow arch and collapse?) but it was definitely a precarious situation in my front yard. The first branch came down when Tom gave it a good yank; the second one required a bit of manuevering.


Ladders, chain saws, ropes and friends ensued, and the end result is a heap of brush at my curb, and a half-full firewood rack. (I love my orange wheelbarrow!)When it cures by this time next year, I will have great firewood to use! I have lost a bit of shade, but I also now have gained a much larger sunny area in my yard for my upcoming butterfly garden -- but I have lost a really great branch that I had intended to hang Halloween decor from! Alas, I will need to develop a Plan B for that. And I probably need to call a professional tree trimmer to see if I need any further preventative maintenance... Hey! Another trade to call! (See previous post about trades that I haven't yet needed...)

Toxic Microwave - Be Gone!


Remember when microwaves first came out and how monstrously huge they were? I had one of the original, circa 70's dinosaurs in my kitchen... and someone along the way had helpfully DRILLED A HOLE IN THE DOOR and added a cabinet pull for easy opening. Um, yeah. Probably not such a good idea. I am pleased to have it removed now -- my kitchen looks and feels so much better! It took 3 of us to hoist it up and off of the wall brackets -- it was so heavy! And I won't even discuss the vent on the bottom of the microwave and what it catches in 30+ years... Ay yi yi.

Once the beast was out, Tom and I spiffed up the remaining empty space. I put up some faux tin squares to cover up the very old blue and used-to-be-white wallpaper. We cut, stained and poly'd some 1"x12"s... and let's just say the cabinets aren't exactly square... (we found that out the hard way! ) Then added some quarter round to cover the unavoidable gaps from the not square cabinets, and affixed a light.
I realized after the fact that I "lost" my clock and my cook top light in the process. I found a stainless steel light that I mounted up top that works fine. I do probably need a clock; right now I am using my kitchen timer clock which isn't super convenient but do you really need to know what time it is in the kitchen unless you are entertaining? I can tell you this: My dog knows when it is 7 a.m. and 6 p.m. -- her feeding times -- and she lets me know. According to her, none of those hours in between matter.
I don't think I will be replacing the microwave... we'll see if I really miss one or not. My beloved toaster oven has stepped up to the plate quite nicely so far -- oh! And this cute little tiny kettle I bought for melting REAL BUTTER on the stove for my air popped popcorn. (My friend Beth will remember a similar one we used to use at her mother's house... with the ceramic bowl large enough to bathe a baby in, and very late night TV.... Ahhh fun times.)


Friday, September 11, 2009

Window coverings - finally!


I have had such a struggle trying to figure out what to put on these doors for window coverings! They face northwest, so I get a lot of (hot) afternoon sun in them. They are also the doors that I use the most -- which means I didn't really want mini blinds or anything that would slap around when doors opened and shut. Plus I wanted to be able to open just the bottom panels for Greta to look outside, or just the top ones for privacy but still get light. So many requirements and such a dilemma!
I finally decided to sew fabric panels and affix them to the windows with velcro. I can reveal as many or as few rows of panes as I want. So far it's working pretty well -- and they are washable. Bonus.
This isn't a "forever solution" but it works great for now.

Philadephia Find #2


Here is the pendant light that I bought in Philly at that same stained glass shop. When it's off, you'd never guess that it is orange -- it's a strange color unlit -- but I totally love it!

Tuesday, September 8, 2009

Philadelphia Find #1

Remember Marvin in Philadelphia? He owns a stained glass store. Here is one of 4 stained glass pieces I bought from him. I hung it in a kitchen window and the morning sun shining through it is just amazing! (Although as luck would have it I took a photo late afternoon...)

I'll post photos of the others as I get them put into place. I'm still deciding where to put them.

Thursday, August 27, 2009

Philadelphia Find


This man -- his name is Marvin -- has a shop in Philadephia. He sold me something so fitting for my house while we were there last weekend! Photos to follow next week...!

Wednesday, August 19, 2009

Who am I missing?

This morning I told my boss that I have started contacting companies that demolish concrete -- and he laughed and asked me if there are any trades left whom I have not had out to my house? We reviewed: carpenter, painter, plumber, electrician, roofer, A/C, furnace (I know, technically HVAC together but it makes for a better story to split them up) wrought iron worker, landscape engineer... And sometime this fall I'll need a chimney sweep. With Tom's help I plan to tackle tree limb trimming myself, so hopefully that's off the list.

I'll do a shameless plug here for Angie's List -- I've had great experience so far with the companies I have found there. (Google it for your area.) The reviews from other people like me who have hired them are invaluable. Thanks, Sara.

What's Under the Tarp?


There something fabulous under this tarp -- but since I am flying to Philly tomorrow for a fabulously girly weekend, the unveiling will have to wait until next week. Drat!

Monday, August 17, 2009

July 4th, 2009: Living with Nature


And when I say living "with" nature, I mean literally sharing my living space. In the days leading up to July 4th weekend, I had heard birds chirping. Loudly. I thought they were in my chimney. I tried ignoring them. But my chair was feet from the chimney, and gosh darn it, those birds were LOUD. I was losing it. I was instant messaging with a friend in Minneapolis, and she asked me if I had actually looked up the chimney. Looked? Up the chimney? And if I saw birds, what would I do? And by then I would surely have scared the bird poop out of them, which would likely land on my face, as I was looking up, right? Not a good scenario.

But then... the chirping just wouldn't stop and the idea of looking had been planted in my brain. I got my big flashlight, moved the very old andirons out of the fireplace, and laid down on my back... like plumbers do under sinks. I tentatively turned on the flashlight and peered upwards. Nothing. In fact, I could see a bit of sky up there -- encouraging. Satisfied I got up. Put the flashlight away. Settled back into my chair.

And heard chirping. But this time the chirping was accompanied by fluttering of wings. Mystified, I got up, and starting bending over towards the fireplace and walls, listening. Oh my gosh! I have birds IN MY WALLS! As in BEHIND THE SHEETROCK!

The next day Tom was over. The chirping and fluttering continued. He could hear it too, and now so could Greta -- who was certain that if she sniffed vigorously enough in that part of the wall where the wood trim met the fireplace brick she could pull the birds out of the wall. I moved furniture to that corner to keep her away. Sensing confirmation of what she already suspected -- prey was in the house! -- she paced and tried to strategically end up in that corner of the room. Night came. I went to sleep to chirping.

The next day I went knocking on neighbors' doors. These were can-do women. I needed help. I was pulling down sheetrock. The birds must be set free. Alas, they were not home.

I emailed a neighbor -- "I have birds in my walls!" She shot back, "Wait until winter. My first year here I had 3 exterminators with rifles shooting tree rats out of trees in my backyard. I nearly moved out of my house the first month I was here." Tree rats? Rifles? Clearly that's a story I must hear, but right now? Birds. Behind sheetrock. And remember the neighbor's story about raccoons and floor furnaces? Insert that story here.

So now it is Friday night, July 3rd. The Friday before a long holiday weekend. 5:50 p.m. I am contemplating a hotel. I call Wild Birds Unlimited, and explained my situation: birds, sheetrock, trim around fireplace... They suggested I call the DFW Wildlife Coalition. I do. The woman on the phone suggested a net. And a friend. And that maybe I should open the windows. Um yeah. The windows that are painted shut. Then she suggested I call 911 Wildlife. A humane animal rescue group. By now it's 6 p.m. -- the phone mail system says they close at 6 but to leave a message. Dubious but desperate I leave a voice mail describing my plight.

Less than 10 minutes later, my phone rings. It's them! They get the story, and tell me they will dispatch a "team" to my house -- will 9 a.m. be okay with me? They will call first. The team leader will be Robert.

Encouraged, I go to bed.

The one man "team" arrives: Robert. he has an array of cool tools and gadgets. Me, I am crouched on a chair in a launch position with my camera. He removes the mantle, removes the trim, and snakes a camera on a cable into my wall and begins making bird noises. Impressed, I joke with him about that being part of the interview process for his job. He says this isn't even his real job -- he's a sociology student. (?!) He fishes around in the wall for a few minutes, "shushing" me so he can listen. Then he sits back and prounounces, "I'm afraid our little friend has shuffled off his mortal coils." ? I have William Shakespeare in my livingroom, making bird noises.

Short cut to the end of the story: One bird didn't make it; it did its final shuffle in a used McDonald's sack. Robert left, 20 minutes later we heard more bird noises, Robert returned, apologizing (needlessly -- those Eastern Sparrows are feisty little things) profusely, located a second bird out of reach, we left it 2 exit routes, and we just hope he flew out and didn't shuffle.

I learned all sorts of helpful tips from Robert. And the visit was only $75 for probably 3 hours of work. He answered all my questions about raccoons and possum, and gave my house a winter critter preventative maintenance review and me a list of things to do. Handy, that. Here's a link to this great resource: http://911wildlife.org/.

August 16th: Vents -- those breezy little things near the floor

The house is on a pier and beam foundation. And the crawl space is generous, I'm told, at least on the one side of the house where the slope is greater. Many things are under the house -- I'm positive none of them are creepy (although at this very moment I have the crawl space door unlocked and open because I fear I might have an angry skunk trapped under my house... it's... aromatic.) At any rate, one of the things under the house is the HVAC system and all the ductwork. No basements here.

Anyway as a result, my HVAC vents are not up on the walls near the ceilings like newer homes. Not a big issue, really, except that I've discovered that furniture arrangement requires a bit of forethought so that you don't completely block airflow. (A stroke of luck put the wine rack directly over the floor vent -- it's divine how the A/C blows gently on all my bottles of wine! Equal to the beauty of that is the horror that in the winter that same vent will blow heat on my bottles of wine... hmm...)

Anyway, because the baseboards were painted white, so were the metal air vents. I used a heat gun (what a great invention!) and a putty knife, and scraped off the many layers of many colors of paint. It went pretty fast. I sanded down the rough spots, and bought some spray paint in sort of metallic bronzy color to blend in with the new baseboards. I re-installed two. Yes, just two. The other 4 languished on my back stoop for weeks. Other projects came and went, but my 10x6" gaping holes in my baseboards remained. I ran out of spray paint... having not written down the name of the color, when I bought a new can I bought the wrong color. The vents were just the albatross around my neck for no particular reason.

Then I was talking with a neighbor about the possibility that I had birds in my chimney. She told me that since we used to have floor furnaces (exactly what those are isn't totally clear to me) that we have these metal tube chimneys that run from our crawl space up through the roof. I indeed have two of those in closets. She told me until she got hers covered with wire mesh on the roof (there is an asbestos issues to remove them I'm told, so lots of people just work around them) that she had an issue with raccoons. As in, raccoons falling down the tube and ending up in the ductwork under the house. Comical no?

Yes, I thought it was comical too, until I realized that quite possibly those ducts were connected to the current HVAC system, which -- are you ahead of me? -- yes, which open up into those gaping 10x6" holes in my baseboards! All I could envision was a little bandit peering out at me from the baseboards one evening while reclining and watching my favorite episode of Bones. Moments of panic ensued.

But... they passed. Somehow I managed to rationalize that that chain of events simply could not be strung together, and that there was nothing to worry about. The vents languished for a few more weeks. And this past weekend? Finally, the vent painting was completed, and some of the vents were even marginally modified for better airflow, and put in place. Sorry to be anti-climatic -- no raccoons scurried into my living space. They still have a chance though -- if they saw a piece of tin foil they just had to have, they could probably bully their way in -- the vents aren't affixed with screws -- the baseboards are holding them up quite nicely.

May/June 2009: Windows... they open, right?


My house is very bright and airy. I have 4 doors that lead outside -- one of which is a set of french doors so if I really wanted to get technical about things I could say five -- add the pet door (another story...) and I have six! But this post is about windows. My fifteen windows. My fifteen windows that are painted shut. And caulked shut on the inside. And on the outside. Uh huh. Paint, and caulking, inside and out. It makes me wonder what previous owners were trying to keep in... or out...

Nonetheless, I am an open window type of girl. And while I realize it's too hot to have the windows open here now, in August, October will be a different story. And so in my first days of home ownership, in those glorious days when I walked around my brand new, totally empty, waiting just for me house, marveling about all the fabulous projects that lie ahead of me -- but not knowing where to begin -- I set about getting windows to open. And I am trying really hard to be careful not to break the glass (for obvious reasons) but also because it looks like some of the window glass is actually original. It's that cool old timey wavey type of glass.

It was all very romantic. A girl, in her dream house, hair pulled back, a breezy spring day... ah, yes. Just her in her perfect little house, all the months of stress behind her... possibly even humming.

Okay, it took four hours -- FOUR HOURS -- to get the first window open. I worked on it for 2, and Tom worked on it for 2. I now have this handy little tray with seven different hand tools on it... my window opening kit. Honestly. With a bit of practice, we have the technique down to about 2 hours. And of the fifteen windows, four of them open. One in each room. That's enough for a cross draft, right? If you count the 6 doors that open?

I also have the inside part of the two kitchen windows done; but not the outside. When I got most of the inside done, I went outside to assess and begin that side of the window. You know, work the inside a bit, then the outside, and then the inside and then start trying to heave it open? There's this small detail that my street is on a slope. On one side of my house, you can stand on the ground and reach the windows. Okay, you might want a short step ladder. But on the other side! Let's say it's a good thing that I bought the 26 foot multi-position-I-think-it-even-configures-into-scaffolding-ladder, because the OTHER side of the house is quite a different story (no pun intended, really.) I suspect it will take a pan of brownies to bribe Tom into doing the outside of the kitchen windows.

And did I mention that I don't have any screens, and that Texas has the largest flying bugts you have ever seen? I'm certain that we can make window screens. Certain.

May/June 2009: Laundry Space


You see why I was compelled to name this post "laundry space" instead of "laundry room..."

When I bought the house, the laundry room (okay, I give in) was a single door, and there was a stackable W/D inside at an awkward angle. I determined that I could buy a stackable W/D (I owned a full sized side by side set) or I could take the cash I would spend on new W/D and upgrade the laundry area and increase the overall value of my house.

So, you see the before photo -- a tiny space with things jumbled in it, and then the after photos.

I really struggled with doors -- I have 4 or 5 old doors from this house out in the garage, but I don't have 2 that match. I looked many places for interior doors to match the existing interior doors here, and I found them, but gosh they were about $300 or $400 EACH. Yikes. Then I asked Vic if he would make me some (not "could" he, because I know he could -- but "would" he -- and the answer was a firm, "no." I suppose someone had to say "no" to me at some point.)

So for now I just bought two of those cheap hollow doors at Home Depot and took the door hardware off two of the doors in the garage so the hardware does match the rest of the house, and for now that is working fine. We stained the doors and they don't look bad.

After shopping around for laundry shelving that wasn't ugly and failing, (I am one of the few people who is not a fan of Elfa) Tom and I built the shelving over the W/D. We stained and polyurethaned the wood to match the other new woodwork. I intended to use the space for a while, determine what types of things would be stored there, and then add vertical planks for dividers to make cubes. So far that hasn't happened, but wow, what a life saver this storage space has been! (And to the person looking at these photos who likes to look at the background details of photos, rather than the intended subject matter -- stop it! You don't need to know what type of TP I buy. You know who you are... I'm just kidding! )