Monday, October 10, 2011

Bwah-ha-ha-ha-ha

Halloween has sprung!  For your viewing pleasure... A big thanks to Red for his help...

The first few photos are the decorations I used last year.  It was a relief this year to have some items ready to go -- not doing the first year scramble any more!


These decorations on my front porch are new this year:


I got the greatest deal on those "flat" pumpkins!  Hopefully they will remain stacked... I was prepared to pay a lot more but Kroger had a super deal on them.

Then I bargain shopped at a local thrift store and found those light up pumpkins (I also got a single one that isn't in the photo). 

And then my favorite??  THE LEGS!!


I saw a photo of those online when I did a search for "planter Halloween decorations" and decided I HAD to have them!  I looked for mannequin legs on Craig's List and actually found some, but they were geographically undesireable.  Then I searched for "inflatable legs" -- which has probably scarred my Google search history for life.  In the end I decided to just make them.  Then I bought a pair of tights, went to the infamous local thrift store for boots, make some buckles and glued them on the toes... and ... Voila!  They just make me giggle.  I still plan to get a dollar store witch's hat and lay it askew on the steps (weighted down somehow) as though she lost her hat before she nose-dived into the pot...

What you can't see -- my brick porch column is wrapped in orange lights, and there is a ground spot light that illuminates the ghost in the tree at night.

I'll carve a couple of real jack'o'lanterns when the big night is closer...

Happy Halloween, everyone!

Friday, October 7, 2011

What if...

What if, instead of re-sheetrocking around the door, I removed the remaining sheetrock and left exposed a wall of these horizontal wood planks?  Hmmm...

I think the rustic look would be a great juxtaposition to the chandeliers and mirrored nightstands...  What do you think?

Tuesday, September 27, 2011

Can you dig it?

A girlfriend invited me to go walking with her last night, but I told her I had some shrubs I'd purchased over the weekend that needed to be planted.  I laughingly asked her if she wanted to help?  To my surprise, she did!  Not only was I so thankful for the help, it was a great opportunity to get caught up on what's going on in each other's lives.  And great upper body exercise... we'll always take that...

We got the 3 flowering Sennas in:


As they grow, these can be pruned to be tree-like or shrub shaped.  I am going to do the tree shape.   They attract butterflies, hummingbirds and birds.  I first saw them out at the butterfly garden at Texas Discovery Garden -- I didn't know what they were but they were huge and beautiful.  I made a note of what they were, and was so pleased to find them at my neighborhood organic nursery.  I bought the last 3 plants that Redenta's had... I just couldn't resist them.

Here's the label:


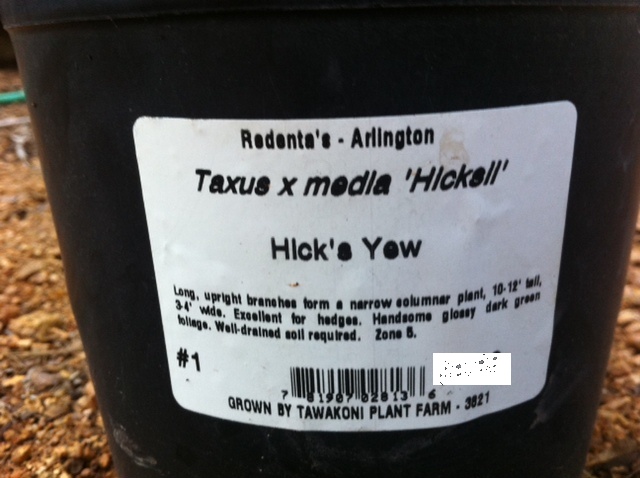
We also planted the three Hick's Yew that I purchased this weekend.  I had them lined up to go along my driveway in the back:


Sure they look sort of sparse there now, but in the right conditions they grow to be 10-12 feet tall, and 3 feet wide.  I thought they would give a good screen there.  I was dreading the process however; I know from past attempts that the soil in that area of the yard is ridiculously difficult to dig.  (As evidenced by it's barren-ness...) My second option was to plant them in my sideyard, outside my pedestrian gate. 

When we had finished planting the Sennas, my (driven) friend asked me what was next and I pointed at the Yew.   I told her I had thought about planting them where I had them placed, along the driveway, but that I needed a second opinion.  TOTALLY classic -- her response -- "Why would you want to put them there??"  I said, "Well, I'm not positive I want them there, but I thought they might give me a border, or a back drop to my yard."  She said, "Yeah, but you already have that -- it's called a fence.  You are going to hate them there."  I showed her the second option and she confirmed that absolutely that's where they needed to go.  It was sooo funny --!  And indeed, I did want a second opinion...

And so into the side yard they went.  Here is a view from my neighbor's driveway looking inward.  We planted those 3 dark green short shrubs.  The third one is difficult to see, but it's up near the fence.


Here's the view looking out of my yard, through my fence (now I'm wondering if I need to move the one by the fence over a little to the left... hmmmm)


Here's the label:


My hope is that they will provide some privacy when they grow taller.  (Have I told you about the ice cream cart guy who just parked his push cart and plopped down on the curb to watch me do yoga one morning??)  I also hope that they shelter that side yard area and are the beginning of making it a more cozy path into my backyard.  Bucky at Redenta's told me they look a little bit like Christmas trees -- maybe I'll decorate them this year... that could be fun...


Other than the addition of the rain barrel and removing leaves that were knee-deep, this is the first real effort I've applied to my side yard in the way of improvements.  It feels good to start working on that area. 
 
While clearing the area of weeds and random monkey grasses (loathe) for the shrubs, I discovered this plant:


I recognized it as one that I have seen in landscape books and nurseries that I knew I wanted -- I didn't know that I already had it!  I couldn't remember the name of it, so I emailed Randy Johnson, the Director of Horticulture at Texas Discovery Gardens.  He replied immediately, and identified it as Inland Sea Oats, or Chasmanthium Latifolium. 

The seeds on it are graceful and unique:

For a grassy plant, I think it's really elegant, and the seeds are eaten by birds. The plant itself is a larval host for the pepper & salt skipper butterfly, Bells road side skipper butterfly, and the Bronzed roadside skipper butterfly.   (Don't be grossed out; that simply means those butterflies will lay their eggs on this type of plant...)  I will definitely give this plant some extra TLC in hopes of it spreading to a larger area. 

I have one more shrub to get in -- a Japanese Yew -- but I can't decide quite where it should go.  I thought I had a place chosen for it, but now I am having second thoughts.  Don't let the suspense keep you up tonight.  :::wink:::

Monday, September 26, 2011

Back, and Back Outside

As some of you have pointed out to me... I've been a slacker on posting lately.  Sorry.  I've been busy.  I can't exactly articulate what I've been busy doing, but -- well, I could, but it would be ramblings of a crazy person.

Our weather has been supreme.  Fall is trying to arrive = bliss.  After spending literally hours lounging on my porch over coffee with neighbors, I finally got moving on Sunday.  My project?  Landscape around my back steps.  The reason?  My friend and client who built and had his crew install the steps-that-are-probably-worth-more-than-my-house for free is coming over today to see them.  YIKES.  As I've said before, I am nothing without a deadline.

I started with a trip to Home Depot landscape which was a huge fail.  Zzzzzz.  Nothing remarkable there at all.  I headed over to Redenta's.  And had to make two trips home to get all my bounty to my house! 

I procured Ajuga Chocolate Chip groundcover (3); butterfly weed (3) a flat of ferns, a flat of Munstead English Lavender, a flat of Peppermint, Phlox (2), Bee Balm (3), Hick's Yew (3), Japanese Yew (1), Flowering Senna (3).  Then a bottle of Liquid Seawood for feeding, 2 bags of cedar mulch (mmmm smells soo good) and 7 bags of compost.  And before I got all that, I had 3 flats of lantana (only $10 a flat!) from Red's and my excursion to the Farmer's Market the day before.  (Saturday's post will come later.  I know -- out of order -- I'm a rebel.)

I was repeatedly thankful for my Mantis tiller that Red gave me.  It made such easy work of a huge task.  Huge.  Task.  And now for the great photo reveal:

First, just for fun, let's take a trip down memory lane. 

Words defy this deck structure that was there when I moved in.  I'm sure I displaced any number of creatures when I took that out.


The deck came down, the steps were saved and swiveled around for temporary use (omg they were so rickety/hazardous!) and the original concrete steps were discovered.


Then there was nothing...

And here we are today!  It's been a really long road.


The oval "outcropping" in the foreground of the second photo -- the area with the curve of bricks around the end -- it was already there.  It holds Bog Sage, and some other butterfly friendly plants.  You may view the post about that area here: http://my1929tudor.blogspot.com/2011/05/b-for-blue-and-bees.html

I need to re-mulch that area but I ran out of mulch...
Peeking under the porch area -- lantana along the house and the edge of the porch, and behind the lantana underneath the structure are the baby ferns.  I love ferns so I really hope this proves to be the perfect shady location for them.  In front of the concrete footing are 2 of the Butterfly Weed (sort of hard to see) and 3 lavender -- the lighter colored clumps of green.

This is the cubby area between the steps and the porch.  That's all lantana.  I can't recall the name of the white blooming plant in the foreground.  I'm calling it phlox here, but that isn't correct.  It's very attractive to butterflies though; it has a distinctive smell.

Here, starting at the stepping stone and going clock-wise:  Bee Balm, Munstead Lavender, Ajuga Choco Chip, Lavender, Lantana, and completing the circle at the top left, another Lavender.  I gave in and put 2 flagstone pieces through this area because Greta insists on a short cut back to the steps.  May as well give her stepping stones... she's going that way regardless.

Being planted tonight?  The 3 Flowering Senna, the 3 Hick's Yew, and the Japanese Yew.  Check in tomorrow for photos!

Monday, September 19, 2011

Sweet Sweet Organization

Yesterday was a marathon day of emptying out, cleaning, and re-organizing the garden side of my back shed.  I owe Red a huge thank you for dedicating the better part of his day to my very dusty project.  It was the perfect weekend to tackle the project; it wasn't really hot out, and it was bulky trash weekend.  Most of the items that I discarded had a very short life on the parkway before "pickers" absconded with them.

I forgot to take "before" photos -- lately I've been forgetting that often! -- but suffice it to say that when we started, you couldn't even walk into the shed it was so full and so disorganized.  And on some days, I had to struggle to completely close the doors to lock them -- they were literally bulging.

Well no more!  Now I can stand in the middle of the room, stretch my arms out, and spin around.  I know, because I did that.  And periodically through the afternoon I did little jigs of joy, and clapped and giggled at the progress we were making.  The end result is ... magical.  And I can find everything.  I found some things that I forgot I had - (shocking, right?)

When I moved in to my house, the shed was full of cans and cans and CANS of old paint, and old chemicals.  Red and I did more than one trip to the City of Dallas chemical drop off point.  There were some built in wooden shelves on one side - decent - and a metal rack on the left side.  Over time, the metal rack proved to have shelves that were too deep to find things, and it was rusty.  Sort of gross.  So, the metal shelving came out, and the wooden shelves remained.  Only took me 2 years...

Red had given me a shelf/work bench kit for Christmas last year.  Well he actually gave me two, and the first one we built for my workshop - FAB.  (I can't find a photo of it... hmmm)  This one is the type where the connectors were provided, and then you insert 2"x4"s to make the structure into whatever you want.  I chose sort of a potting bench design.  And, bonus, I had enough 2"x4"s in my shop to build it -- I didn't have to go buy more.  Sweet.

So, here's what you see now when you open the double doors - the space looks huge to me!

Sitting majestically in the middle is my rechargeable battery lawnmower.  Love.  I got that during a mower exchange program the City had a few years ago.  Bring in your old stinky gas mower, and get this battery one for $200.  I think they retail for $400.  Anyway -- highly recommend.  It is so quiet!  And it doesn't stink... And my new candy-apple-red tiller to the left of the mower.

Here is the left wall, with the shelving we built:

I have several hooks on the underside of the top shelf for all my garden tools.  We affixed what hooks I had on hand -- more than you might expect -- Red said he didn't know I had a hook fetish... lol  but I will be adding more.  You really can't have too many...

I can add a middle shelf, lengthwise there above the table where you see the black connectors.  I ran out of lumber, but then realized that I might like it open like that, without a shelf.  And then below, 5 gallon buckets fit just perfectly.  I'd like to say I planned that...

Here is the view on the right hand side, where the existing shelves are:

Yes, that's my natural gas meter, inside my shed.  Yeah, I don't know.  Don't ask...  There are two shelves for all my bags of soils and soil amendments.  A big hook for my extension cords.  A shelf for all my windshield washer fluid (why do I have 6 jugs of that?  We don't know.)  A shelf for all the citronella for my lanterns... a shelf for all my car washing supplies... it just goes on and on in a blissful sort of way. 

Red got creative on space saving and hung several things from the rafters.  Behold, the drink tub that has the dog's Elizabethan Collar inside (the lampshade type...)


Behold, all my plant support stakes -- I've never found a decent way to store those where they don't get all tangled up and bent... and next to those my tomato cages and raspberry supports.


And at the end of the shelving, a corner we left for tall things.  It does have some tall things in it, in the back, I promise!